Stencil making is one of the most useful skills for crafters, designers, teachers, small business owners, DIY decorators, and digital product creators. A good stencil helps you repeat the same design again and again with clean edges, balanced spacing, and less manual drawing.
This complete guide explains the tools, materials, techniques, software, and practical workflow needed to make high-quality stencils at home or for a small creative business. It is part of the Stencil Making Tools & Techniques silo on digitalonday.com.
If you are new to this topic, start with this pillar guide first. After that, you can explore related guides like Cricut stencil making for beginners, best stencil materials for reusable designs, and how to make SVG stencil files for cutting machines.
What Is Stencil Making?
Stencil making is the process of creating a cut-out design on a sheet of material so paint, ink, chalk, henna, spray color, or another medium can pass through the open areas. The stencil acts like a controlled template. Instead of drawing the same shape by hand every time, you place the stencil on a surface and apply color through the cut areas.
A stencil can be used on:
- Paper
- Wood
- Fabric
- Walls
- Glass
- Canvas
- Packaging
- Signs
- Cards
- Labels
- Craft blanks
- Event décor
- Practice sheets
The main goal is simple: make a design that is easy to apply, easy to repeat, and clean enough to look professional.
Why Stencil Making Tools Matter
Many beginners think stencil quality only depends on the design. In reality, tools matter just as much. A beautiful design can fail if the blade is dull, the material is too thin, the cutting mat is dirty, or the file has disconnected islands.
Good stencil making tools help you:
- Cut cleaner edges
- Avoid torn details
- Save time during production
- Reuse designs multiple times
- Reduce paint bleeding
- Keep letters readable
- Create professional craft products
- Build a digital stencil business
The right tool depends on your project. A hand-cut paper stencil may be enough for one quick school craft. A reusable mylar stencil may be better for signs, furniture, packaging, or repeated use. A Cricut or Silhouette machine may be better for detailed digital designs.
Main Types of Stencil Making Tools
Stencil tools can be divided into manual tools, digital cutting tools, software tools, finishing tools, and application tools.
Manual Stencil Cutting Tools
Manual stencil tools are simple, affordable, and beginner-friendly. They are best for small projects, rough drafts, classroom crafts, and one-time stencils.
Common manual tools include:
- Craft knife
- Precision blade
- Cutting mat
- Metal ruler
- Pencil
- Tracing paper
- Tape
- Scissors
- Hole punch
- Compass cutter
A craft knife gives better control than scissors for detailed shapes. A self-healing cutting mat protects your table and keeps the blade moving smoothly. A metal ruler helps create straight lines without cutting into the ruler edge.
Manual cutting is best for:
- Simple shapes
- Large letters
- Kids’ craft templates
- Paper stencils
- Cardstock stencils
- Quick prototypes
- Low-budget projects
Manual cutting is not ideal for very detailed patterns, tiny lettering, repeated production, or complex commercial designs.
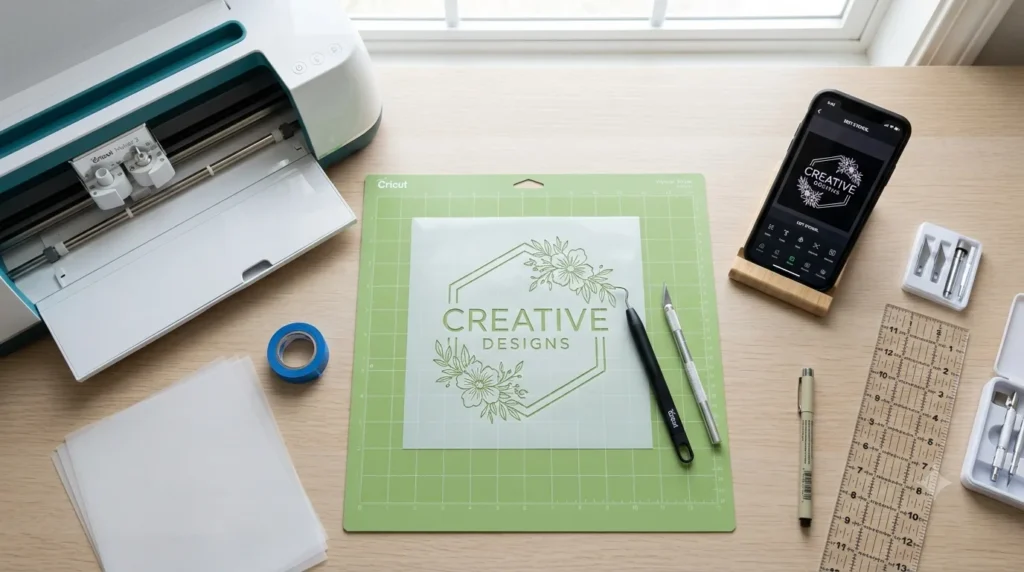
Digital Cutting Machines
Digital cutting machines are popular because they can cut detailed stencil designs from digital files. These machines use blades to cut materials like vinyl, cardstock, stencil film, and thin plastic sheets.
Popular cutting machine types include:
- Cricut machines
- Silhouette machines
- Brother ScanNCut
- Siser cutters
- Other vinyl cutters
A digital cutter is useful when you want accuracy, repeatability, and scalable production. If you plan to sell stencils, make printable templates, or create craft products regularly, a cutting machine can save a lot of time.
Digital cutting machines are best for:
- SVG stencil files
- Reusable stencil designs
- Vinyl stencils
- Lettering stencils
- Logo stencils
- Craft business products
- Repeat orders
- Event decoration templates
The main limitation is that you need clean digital files. Poor file preparation leads to tearing, missing cuts, uneven bridges, and wasted material.
Laser Cutting Tools
Laser cutters are used for more advanced stencil making. They can cut materials like acrylic, wood, cardboard, paper, and certain plastics. Laser cutting is useful for strong reusable stencils, signage, packaging templates, and commercial craft production.
Laser cutting is best for:
- Thick reusable stencils
- Acrylic stencil templates
- Wood craft templates
- Business signage
- Industrial marking
- Large format designs
- High-detail repeat production
However, laser cutting requires safety knowledge. Some plastics and vinyl materials can release harmful fumes when cut with a laser. Always check material safety before laser cutting.
Stencil Design Software
Software is where modern stencil making starts. Even if you cut the stencil manually, design software helps you plan spacing, resize shapes, create symmetry, and export files.
Useful stencil design software includes:
- Adobe Illustrator
- Cricut Design Space
- Silhouette Studio
- Inkscape
- Canva
- Affinity Designer
- CorelDRAW
- Procreate for sketching
- AI design tools for idea generation
For cutting machines, vector files are usually better than image files. SVG files are especially useful because they keep shapes scalable and clean.
Best Materials for Stencil Making
Choosing the right stencil material is one of the most important decisions. The best material depends on whether the stencil is temporary, reusable, adhesive, washable, flexible, or printable.
Paper Stencils
Paper stencils are cheap and easy to make. They are good for one-time use, school projects, tracing, and simple craft work.
Best for:
- Kids’ crafts
- Practice designs
- Simple shapes
- Printable templates
- Quick projects
Weaknesses:
- Not waterproof
- Tears easily
- Not reusable for wet paint
- Poor for detailed edges
Cardstock Stencils
Cardstock is stronger than normal paper. It works well for temporary signs, classroom crafts, gift tags, and simple painting projects.
Best for:
- One-time wall art
- Greeting cards
- DIY packaging
- Large letters
- Practice cutting
Weaknesses:
- Can absorb paint
- May curl with moisture
- Not ideal for long-term reuse
Mylar Stencils
Mylar is one of the best materials for reusable stencils. It is flexible, washable, durable, and works well for many painting projects.
Best for:
- Reusable craft stencils
- Wall stencils
- Furniture painting
- Sign making
- Packaging templates
- Small business stencil products
Mylar is a strong choice when you want a stencil that customers can use multiple times.
Vinyl Stencils
Vinyl stencils are popular for smooth surfaces. Adhesive vinyl sticks to the surface and helps reduce paint bleeding.
Best for:
- Glass
- Wood signs
- Tumblers
- Mugs
- Smooth boards
- One-time paint projects
- Custom lettering
Weaknesses:
- Usually not reusable
- Weeding can be time-consuming
- Not ideal for rough surfaces
Plastic Sheet Stencils
Plastic sheets can be used for reusable stencils if they are thin enough to cut and strong enough to wash.
Best for:
- DIY reusable stencils
- Large patterns
- Wall décor
- Kids’ activity templates
- Craft workshops
Weaknesses:
- Some sheets are hard to cut manually
- Edges may not be as clean without a machine
- Thickness must match your cutting tool
Acetate Stencils
Acetate sheets are transparent, flexible, and useful for tracing and light stencil work.
Best for:
- Simple reusable stencils
- Transparent placement
- Craft painting
- Journaling
- Card making
Weaknesses:
- Can be slippery
- May not last as long as mylar
- Cutting tiny details can be difficult
How to Choose the Right Stencil Material
The right material depends on your use case.
Choose paper if you need a quick printable template.
cardstock if you need a stronger one-time stencil.
vinyl if you need adhesive contact on a smooth surface.
mylar if you need a reusable stencil.
acetate if you need transparent placement.
acrylic if you need a strong laser-cut stencil.
Before choosing material, ask:
- Will this stencil be reused?
- Will it touch wet paint?
- Does it need to stick to the surface?
- Is the design detailed or simple?
- Will it be cut manually or by machine?
- Is the surface flat, curved, smooth, or textured?
- Is this for personal use or customer use?
Step-by-Step Stencil Making Process
Step 1: Choose the Purpose
Start with the final use. A wall stencil, fabric stencil, packaging stencil, and vinyl sign stencil all need different materials and techniques.
For example, a reusable wall stencil needs stronger material than a one-time paper stencil. A vinyl stencil for glass needs adhesive backing. A stencil for fabric needs flexible material and clean edges.
Step 2: Select the Design
Choose a design that works as a stencil. Not every image is stencil-friendly. A good stencil design has clear shapes, strong outlines, readable spacing, and connected inner areas.
Avoid designs with:
- Too many tiny details
- Thin floating lines
- Very small text
- Weak bridges
- Complex shadows
- Low-resolution images
Step 3: Convert the Design Into Stencil Format
If you are using software, simplify the design before cutting. Convert text to outlines, remove unnecessary details, and make sure inner shapes are connected with bridges.
Important stencil design terms:
- Islands: inner parts that may fall out if not connected
- Bridges: small connecting parts that keep islands attached
- Negative space: cut-out area where paint or ink passes through
- Positive space: material that stays in the stencil
For example, letters like A, O, P, D, B, and R need bridges if you want the inner parts to remain attached.
Step 4: Resize the Design
Resize the design according to the final surface. A stencil that looks good on a laptop screen may become too delicate when reduced.
Before cutting, check:
- Letter height
- Line thickness
- Gap between shapes
- Border width
- Overall stencil size
- Placement area
For beginners, larger and bolder designs are easier to cut and apply.
Step 5: Choose the Cutting Method
Choose manual cutting, machine cutting, or laser cutting.
Manual cutting is best for simple designs.
Machine cutting is best for detailed craft stencils.
Laser cutting is best for durable professional stencils.
Step 6: Cut a Test Version
Always test before cutting the final material. Use cheap paper or scrap material first.
A test cut helps you check:
- Are the lines too thin?
- Are the letters readable?
- Are the bridges strong enough?
- Does the design lift cleanly?
- Is the material cutting properly?
- Is the size correct?
This one step can save a lot of wasted material.
Step 7: Weed or Remove Cut Areas
After cutting, remove the parts where paint or ink should pass through. This process is called weeding in vinyl and cutting machine workflows.
Use a weeding tool, tweezers, or craft knife to remove small pieces carefully.
Step 8: Clean the Edges
Check the stencil edges before using it. Rough edges can create messy results.
For manual stencils, trim leftover fibers.
plastic stencils, remove hanging pieces.
vinyl stencils, make sure all unwanted parts are removed.
laser-cut stencils, wipe away dust or residue if needed.
Step 9: Apply the Stencil
Place the stencil flat on the surface. Secure it with tape, adhesive spray, stencil adhesive, or transfer tape depending on the material.
The stencil must stay flat. If edges lift, paint can bleed underneath.
Step 10: Apply Paint, Ink, or Paste
Use a small amount of paint or medium. Too much paint is the most common reason stencil designs blur.
Better application methods include:
- Dry brush
- Sponge dabbing
- Stencil brush
- Foam roller
- Light spray layers
- Thin paste application
Apply in light layers instead of one heavy coat.
Step 11: Remove the Stencil Carefully
Remove the stencil slowly while the paint is still slightly wet or according to your medium’s instructions. Pulling too fast can smear the design.
For reusable stencils, clean them immediately after use.
Best Techniques for Clean Stencil Results
Use Less Paint
Beginners often use too much paint. Stenciling works better with a dry brush or light layers. Remove extra paint from your brush before applying.
Dab Instead of Dragging
Dragging the brush can push paint under the stencil. Dabbing keeps the paint controlled.
Keep the Stencil Flat
Use tape, adhesive, or weights to stop movement. A moving stencil creates blurry edges.
Choose Bold Designs First
Thin details are harder to cut and harder to paint. Start with bold shapes before trying complex designs.
Clean Between Uses
Reusable stencils need cleaning. Dried paint can clog details and create rough edges.
Test on Scrap Material
Always test your stencil on scrap paper, cardboard, or sample material before using the final surface.
Cricut Stencil Making Tips
Cricut machines are popular for stencil making because they can cut detailed designs from vinyl, stencil film, cardstock, and other compatible materials.
For better Cricut stencil results:
- Use clean SVG files
- Choose the correct material setting
- Use a sticky but clean cutting mat
- Test cut before final cutting
- Replace dull blades
- Weed slowly
- Use transfer tape for vinyl stencils
- Avoid overly thin details
- Keep bridges strong
- Use bold fonts for stencil lettering
If your Cricut stencil tears, reduce design complexity, check blade sharpness, and make sure the mat is not too dirty or too sticky.
For a deeper tutorial, create a related cluster article: Cricut Stencil Making for Beginners.
Stencil Fonts and Lettering Tips
Stencil lettering needs special planning. Normal fonts often have floating centers. Letters like O, A, D, P, R, B, and Q may lose their inner parts unless you add bridges.
Best font types for stencil making:
- Bold sans-serif fonts
- Industrial stencil fonts
- Military-style stencil fonts
- Rounded stencil fonts
- Large display fonts
- Simple block fonts
Avoid:
- Thin script fonts
- Tiny cursive lettering
- Fonts with fragile details
- Highly decorative fonts
- Low-contrast fonts
If you want script lettering, make it large and test carefully.
Common Stencil Making Mistakes
Mistake 1: Using the Wrong Material
A paper stencil will not perform like mylar. Vinyl will not behave like cardstock. Match the material to the project.
Mistake 2: Cutting Details Too Thin
Thin cuts tear easily and paint poorly. Keep details bold enough to survive cutting and application.
Mistake 3: Forgetting Bridges
Without bridges, inner parts of letters and shapes may fall out. Always check islands before cutting.
Mistake 4: Using Too Much Paint
Heavy paint causes bleeding. Use dry brushing, dabbing, or light layers.
Mistake 5: Not Testing First
Skipping a test cut can waste expensive material. Always test the design at the final size.
Mistake 6: Using a Dirty Mat or Dull Blade
A dirty mat can cause shifting. A dull blade can drag material instead of cutting cleanly.
Problem-Solution Guide
Problem: Paint Bleeds Under the Stencil
Solution: Use less paint, secure the stencil better, and apply paint in light layers. For smooth surfaces, adhesive vinyl may work better.
Problem: The Stencil Tears During Cutting
Solution: Use thicker material, simplify the design, replace the blade, or increase the size of thin details.
Problem: Small Letters Are Not Clear
Solution: Use a bolder font, increase letter size, and add proper bridges.
Problem: Vinyl Is Hard to Weed
Solution: Use a simpler design, improve cut settings, and weed slowly with good lighting.
Problem: Reusable Stencil Warps
Solution: Avoid excessive heat, clean gently, and store the stencil flat.
Real-World Uses of Stencil Making
Home Décor
Stencil making is useful for wall patterns, furniture painting, wooden signs, trays, storage boxes, and decorative boards.
Small Business Branding
Small businesses can use stencils for packaging, logo marks, product tags, gift bags, shipping boxes, and handmade labels.
School and Classroom Projects
Teachers can use stencils for bulletin boards, activity sheets, craft days, art lessons, and event decoration.
Event Decoration
Stencils work well for weddings, birthdays, cultural events, baby showers, seasonal parties, and DIY photo booth props.
Craft Product Selling
Digital creators can sell SVG stencil files, printable stencil templates, reusable mylar stencils, vinyl stencil packs, and themed design bundles.
Comparison: Manual Cutting vs Cricut vs Laser Cutting
Manual cutting is best for beginners who want a low-cost start. It is simple but slower.
Cricut or similar cutting machines are best for crafters who want repeatable digital designs. They are accurate and useful for small businesses.
Laser cutting is best for advanced users who need strong, professional, reusable templates. It requires more cost, space, and safety knowledge.
Choose manual cutting for simple projects.
Cricut-style cutting for craft production.
laser cutting for durable commercial stencils.
People Also Ask
What Tool Is Best for Making Stencils?
For beginners, a craft knife, cutting mat, and cardstock are enough. regular stencil making, a Cricut or Silhouette machine is more efficient. For professional reusable stencils, mylar with a cutting machine or laser cutter is better.
What Material Is Best for Reusable Stencils?
Mylar is one of the best materials for reusable stencils because it is flexible, washable, and durable. Plastic sheets and acrylic can also work depending on the project.
Can I Make Stencils Without a Cricut?
Yes. You can make stencils with a craft knife, scissors, cardstock, acetate, or printable templates. Cricut makes the process faster, but it is not required.
What File Type Is Best for Stencil Cutting?
SVG is usually the best file type for cutting machines because it keeps shapes clean and scalable. PNG files can work for printing or tracing, but vector files are better for cutting.
Why Does My Stencil Look Messy?
The most common reasons are too much paint, a loose stencil, thin details, poor material choice, or removing the stencil too quickly.
Expert Tips for Better Stencil Design
Keep your design bold.
Use enough negative space.
Add bridges to floating areas.
Avoid tiny details.
Use simple fonts.
Test before production.
Match material to surface.
Clean reusable stencils quickly.
Store stencils flat.
Create different versions for different sizes.