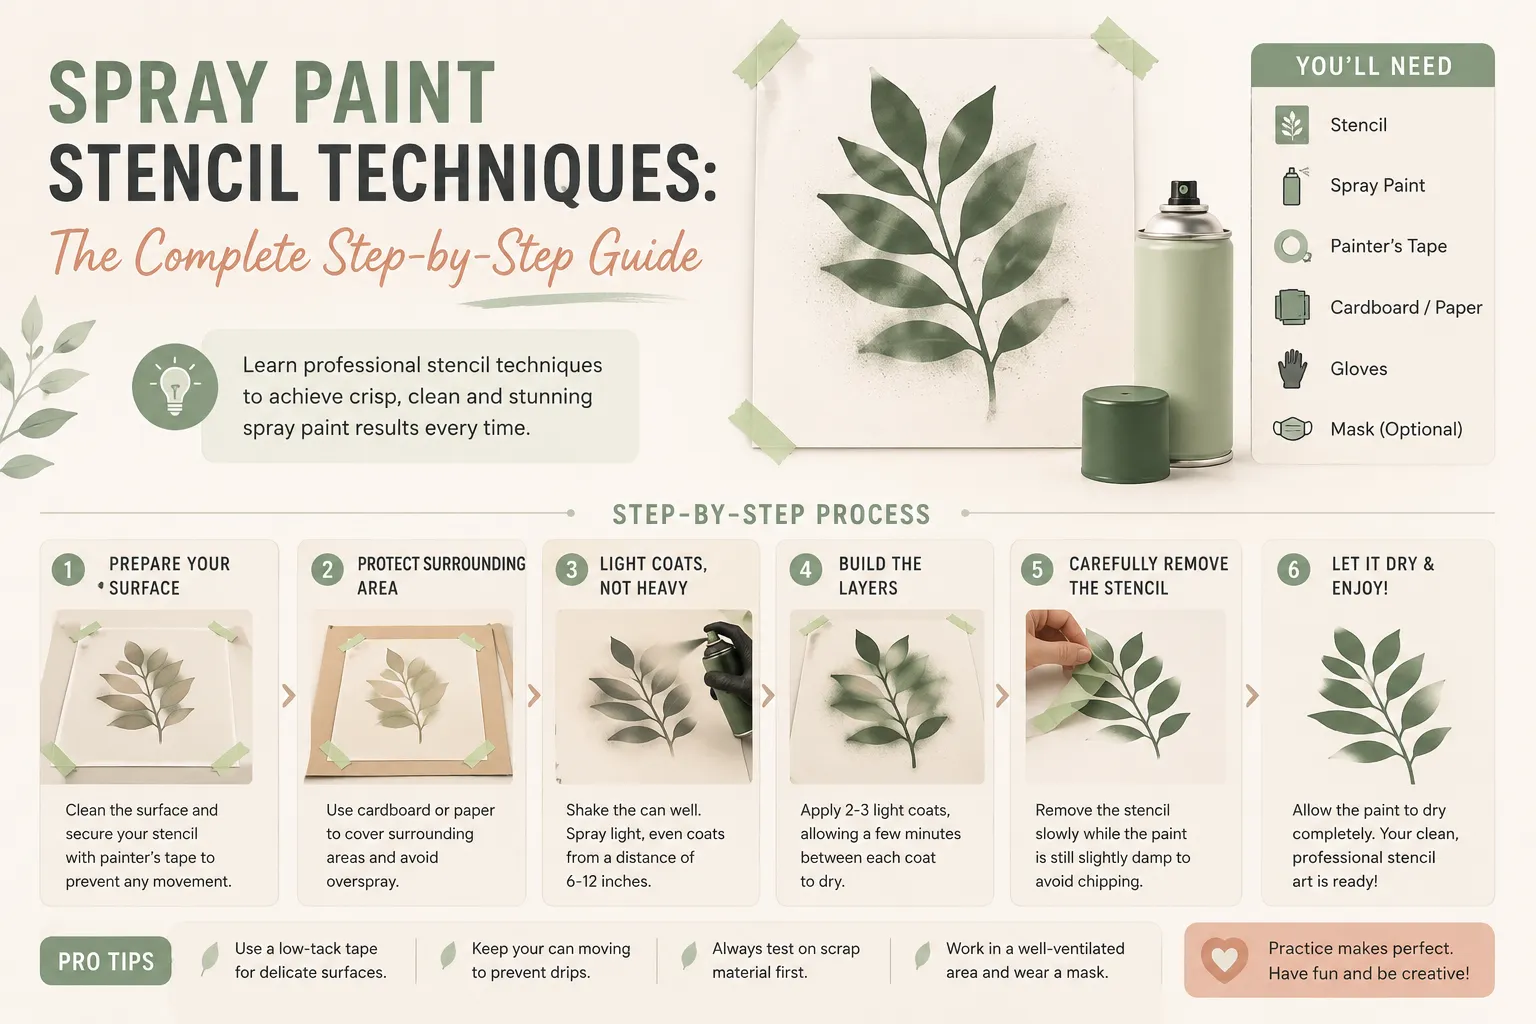
Spray paint stenciling can produce clean lettering, decorative patterns, signs, wall art, furniture details, and multi-layer artwork. However, getting sharp edges requires more than placing a stencil on a surface and spraying over it.
The final result depends on surface preparation, stencil material, paint compatibility, spray distance, stencil contact, coat thickness, weather conditions, and removal timing. If you still need to turn a photo or graphic into a usable pattern, start with our photo-to-stencil tool before preparing the physical stencil.
This guide explains the complete process in simple steps. It belongs to our Stencil Making Tools & Techniques Complete Guide, where you can learn how different stencil tools, materials, cutting methods, and painting techniques work together.
What Are Spray Paint Stencil Techniques?
Spray paint stencil techniques are controlled methods of applying aerosol paint through the open sections of a stencil. The covered areas stay protected, while paint passes through the cut-out design and reaches the surface below.
A stencil is usually made from a thin material such as plastic, paper, vinyl, cardboard, metal, or another cuttable sheet. Its main advantage is that the same design can be transferred repeatedly.
Good stencil spraying depends on three basic controls:
- Keeping the stencil flat and still
- Applying a small amount of paint at a time
- Directing the spray straight toward the surface
Most stencil failures happen when one of these controls is lost. A raised edge allows paint mist to travel underneath. A heavy coat creates wet paint that collects around the openings. An angled spray pushes paint beneath the stencil instead of through it.
What You Need for Spray Paint Stenciling
Prepare all your materials before opening the paint can. This prevents rushed decisions once the stencil is attached.
Essential tools and materials
- A reusable Mylar stencil, adhesive vinyl stencil, paper stencil, or another suitable stencil
- Spray paint made for your project surface.
- Painter’s tape
- Drop cloth, cardboard, plastic sheeting, or masking paper.
- Cleaning cloth
- Surface cleaner suitable for the material
- Scrap cardboard for test spraying
- Protective gloves
- Eye protection
- Suitable respiratory protection when required by the product instructions
- A well-ventilated working area
Optional tools
- Repositionable stencil adhesive
- Measuring tape or ruler
- Level
- Registration marks for multi-layer designs
- Low-tack masking tape
- Sandpaper
- Primer
- Clear protective topcoat
- Small weights, magnets, or a wooden stick for holding loose stencil sections
- Craft knife and cutting mat for repairs
Choose the Right Stencil Material
The best stencil material depends on the surface, design detail, number of uses, and desired edge quality.
Reusable Mylar stencils
Mylar is a flexible plastic material commonly used for reusable stencils. It works well for:
- Walls
- Wood signs
- Canvas
- Concrete
- Furniture
- Repeating decorative patterns
A thin Mylar stencil bends around slight curves, while thicker material stays flatter and normally lasts longer.
Reusable stencils are useful when you want to repeat the same design. However, loose internal sections may rise from the surface. Tape, temporary adhesive, magnets, or light hand pressure can help keep those areas flat.
Adhesive vinyl stencils
Adhesive vinyl is useful when edge sharpness is more important than reusability. It sticks directly to the project and creates close contact around detailed shapes.
It is especially helpful for:
- Small lettering
- Curved objects
- Tumblers
- Glass
- Smooth metal
- Detailed logos
- One-time projects
Cricut’s official stencil instructions recommend applying transfer tape, burnishing the material, and placing the stencil on a clean, dry surface.
Adhesive vinyl can still fail when the base paint has not cured properly. Test a hidden section before applying vinyl over a freshly painted surface.
Paper and cardboard stencils
Paper and cardboard are affordable choices for temporary projects, test designs, and simple artwork.
Their limitations include:
- Absorbing wet paint
- Curling after repeated use
- Tearing around narrow bridges
- Creating raised edges after becoming damp
Use light coats and replace the stencil when it begins to warp.
Magnetic stencils
Magnetic stencil sheets can work well on compatible steel surfaces. They reduce the need for adhesive and help the stencil remain flat.
They are useful for:
- Metal cabinets
- Steel toolboxes
- Workshop equipment
- Industrial markings
- Repeated lettering
Confirm that the project surface attracts a magnet before choosing this method.
Select Spray Paint for the Surface
Do not choose paint based only on colour. The paint must also be compatible with the surface.
Check the paint label for approved materials, drying conditions, recoating time, safety instructions, and whether primer is required.
Wood
Wood may need cleaning, sanding, and priming. Raw wood can absorb paint unevenly, especially around the grain.
For a smoother stencil:
- Sand rough fibres.
- Remove dust.
- Apply a suitable primer or base coat.
- Allow the base to cure.
- Test the stencil on scrap wood when possible.
Metal
Remove dirt, grease, rust, and loose coating before painting. Use metal primer when required.
Glossy metal may need light sanding so the paint can form a stronger bond.
Plastic
Some paints do not bond well to plastic. Use paint clearly marked as suitable for the specific plastic type.
Always test first. Certain solvents can soften, damage, or discolor plastic.
Walls and painted furniture
Clean the area without leaving an oily residue. Repair peeling paint, holes, cracks, or rough patches before applying the stencil.
The existing finish should be secure. Low-tack tape or adhesive vinyl can pull up weak paint.
Glass and ceramic
Remove fingerprints, oil, dust, and cleaner residue. Smooth surfaces normally need paint formulated for glass or ceramic.
Avoid assuming that every spray paint will create a washable or permanent finish.
Canvas, paper and cardboard
Use very light coats. These materials can absorb paint, buckle, or become saturated.
Spray from a controlled distance and avoid holding the can over one area for too long.
Concrete and masonry
Remove loose dust and allow the surface to dry. Deep texture makes perfect edge contact difficult.
A thicker reusable stencil, temporary adhesive, and several light passes usually provide better control than one heavy coat.
Prepare a Safe Spray-Painting Area
Spray paint releases airborne particles and may release solvent vapours. Work outdoors when the product permits it, or use a properly controlled and ventilated area.
The U.S. Environmental Protection Agency recommends increasing ventilation when using products that emit volatile organic compounds and following all label precautions.
Before spraying:
- Remove nearby flames, heaters, cigarettes, sparks, and ignition sources.
- Protect floors, walls, furniture, vehicles, and plants from overspray.
- Keep children and pets away.
- Read the product label and safety data.
- Wear the protection required by the manufacturer.
- Do not assume that a basic cloth or dust mask protects against paint vapours.
- Avoid spraying in a small closed room.
- Position yourself so the air does not blow paint mist back toward your face.
OSHA guidance explains that suitable respiratory protection may be necessary for spray-paint exposure to paint mist, fumes, and vapours.
Spray Paint Stencil Techniques: Step-by-Step Instructions
Step 1: Plan the design placement
Decide exactly where the design will appear.
Use a ruler, measuring tape, level, removable pencil marks, or small pieces of painter’s tape to identify the centre and edges.
For repeating patterns, mark:
- Horizontal spacing
- Vertical spacing
- Starting point
- Pattern direction
- Registration positions
Do not rely only on visual judgement for lettering, borders, or repeated geometric designs.
Step 2: Make a test panel
A test panel is one of the easiest ways to prevent an expensive mistake. For other application problems, see common stencil mistakes and fixes.
Use scrap material similar to your real surface. Test:
- Paint compatibility
- Spray distance
- Paint flow
- Colour contrast
- Stencil attachment
- Removal timing
- Drying time
- Number of coats
Your test should show whether the paint sprays as a fine mist or releases heavy droplets.
Step 3: Prepare the surface
Clean the area and allow it to dry completely.
Depending on the material, preparation may include:
- Washing
- Degreasing
- Sanding
- Removing rust
- Dusting
- Filling cracks
- Applying primer
- Applying a base colour
Do not place a stencil over uncured base paint. Even paint that feels dry may still be soft underneath.
Check the base-paint label for its full curing time.
Step 4: Position and secure the stencil
Place the stencil on your alignment marks.
For reusable stencils:
- Apply painter’s tape around the outer edges.
- Add repositionable adhesive to the back when needed.
- Press narrow bridges and small details flat.
- Confirm that tape does not cover any design opening.
For adhesive stencils:
- Apply transfer tape.
- Burnish the design.
- Remove the backing slowly.
- Position one edge first.
- Smooth the stencil from the centre outward.
- Remove air pockets.
- Press firmly around every cut edge.
Securing the stencil is one of the most important controls for preventing paint bleed. Reusable stencils may also require a stick, pencil end, magnet, or another small tool to hold loose sections while spraying.
Step 5: Mask the surrounding area
Spray mist travels farther than the visible design.
Cover the surrounding surface with:
- Masking paper
- Newspaper
- Cardboard
- Plastic sheeting
- Painter’s tape
- A drop cloth
Protect a much larger area than you think is necessary, especially outdoors or when working near furniture, vehicles, flooring, windows, or finished walls.
Step 6: Shake and test the spray can
Shake the can for the exact period stated on its label. Different products have different mixing instructions.
After shaking:
- Point the can toward scrap cardboard.
- Press the nozzle briefly.
- Check the spray pattern.
- Look for sputtering, droplets, or an uneven fan.
- Continue testing until the spray becomes consistent.
A dedicated stencil spray may have different requirements from standard aerosol paint. For example, Montana’s stencil product recommends a three-minute shake, approximately 15 centimetres of spraying distance, and thin layers. These instructions apply to that product, not automatically to every spray can.
Step 7: Hold the can at the correct angle
Keep the can as close to perpendicular to the surface as possible.
Spraying at a sharp angle directs paint beneath the stencil edge. This produces fuzzy lines and shadow-like marks.
Move your whole arm across the project. Avoid bending only your wrist, because wrist movement changes the distance and angle during each pass.
Step 8: Find the correct spray distance
The correct distance depends on the nozzle, pressure, paint type, surface, weather, and stencil detail.
For many general-purpose products, a starting distance of approximately 8–12 inches is common. Some stencil guides recommend 10–15 inches, while specialised products may be used closer. The product label and your test panel should always control the final decision.
Too close:
- Paint becomes wet quickly.
- Droplets collect around stencil openings.
- Bleeding, runs, and puddles become more likely.
Too far:
- Paint may dry before reaching the surface.
- The finish can become rough or dusty.
- Coverage may look faded or uneven.
- More overspray may escape around the project.
Step 9: Apply the first light pass
Begin moving before pressing the nozzle.
Spray beyond the edge of the design rather than starting directly over an opening. Release the nozzle before your arm stops moving.
Use one of these controlled methods:
Short-burst method
Press the nozzle for less than a second at a time. Move steadily from one area to the next.
This method works well for:
- Small designs
- Detailed letters
- Paper stencils
- Spot corrections
- Areas with loose stencil bridges
Sweeping-pass method
Move the can smoothly from side to side while applying a light spray.
Each pass should overlap the previous one slightly. Do not pause over the design.
Short bursts and controlled sweeping passes are both commonly recommended stencil methods.
Step 10: Build colour with thin layers
Do not try to achieve full opacity in one coat.
A heavy coat is one of the main causes of bleeding. Instead:
- Apply a light mist.
- Allow it to flash or dry as directed.
- Inspect the coverage.
- Add another light coat.
- Repeat only when necessary.
Several thin passes normally create a cleaner finish than one wet layer. General spray-paint guidance also recommends light application rather than a single heavy coat.
Step 11: Control loose stencil areas
Large and detailed reusable stencils may lift around narrow bridges.
Use a pencil, wooden stick, small magnet, or gloved finger to hold one section flat. Spray that area lightly, then move to the next section.
Keep your hand and holding tool outside the active spray path.
Do not press on wet paint.
Step 12: Remove the stencil carefully
The best removal time depends on the paint and stencil type.
Reusable plastic stencil
Lift the stencil straight away from the surface once the paint has settled enough that it will not run.
Avoid sliding the stencil sideways across the fresh design.
Adhesive vinyl stencil
Many crafters remove adhesive stencil material while the final paint layer is still slightly wet or tacky. This can prevent dried paint from forming a bridge between the stencil and the finished design.
However, removing it too early may cause smearing.
Use the test panel to find the safest timing for your exact combination of paint, surface, and stencil material.
When lifting:
- Start at one corner.
- Pull slowly.
- Keep the stencil close to the surface rather than pulling sharply upward.
- Use a craft tool to lift small internal pieces.
- Stop if the base coat begins to peel.
Step 13: Allow the design to cure
Dry-to-touch time is not the same as full curing time.
Do not stack, wash, seal, bend, or heavily handle the project until the paint has cured according to the label.
Temperature, humidity, coat thickness, surface type, and ventilation can affect drying.
Step 14: Apply a protective finish when needed
A clear finish may help protect designs used on:
- Furniture
- Outdoor signs
- Toolboxes
- Decorative planters
- Frequently handled items
- High-wear surfaces
Test the clear product first. Some clear coatings can react with the paint, change its colour, soften the design, or create wrinkles.
Apply the topcoat only after the stencil paint has cured.
How to Prevent Spray Paint from Bleeding Under a Stencil
Paint bleed occurs when wet paint travels beneath the stencil edge.
The most common causes are:
- A loose stencil
- Too much paint
- Spraying too close
- Spraying at an angle
- A dirty or oily surface
- Deep surface texture
- Wind moving the stencil.
- Wet paint collecting at an opening
- Recoating too quickly
Use this prevention process:
- Clean the surface.
- Secure every outer edge.
- Press detailed sections flat.
- Mask the surrounding area.
- Test the spray pattern.
- Keep the can straight.
- Apply a light first mist.
- Build coverage slowly.
- Avoid spraying directly into raised edges.
- Lift the stencil without dragging it.
For a more detailed repair and prevention process, read our guide on how to prevent paint bleed under stencils.
Advanced Spray Paint Stencil Techniques
Edge-sealing technique
On rough surfaces, some painters apply a very light layer of the base colour over the stencil first.
Any small amount that passes beneath the edge matches the background. After that layer settles, the stencil colour is applied.
Test this method because extra paint can also create buildup.
Gradient technique
To create a fade:
- Start with the lighter colour.
- Apply it lightly across the main area.
- Introduce the darker colour from one side.
- Increase the distance slightly for a softer transition.
- Blend using very light passes.
Avoid flooding the overlap area.
Texture technique
Mesh, lace, perforated sheets, leaves, or patterned materials can be used as temporary texture stencils.
Test natural materials first because air pressure may move them.
Reverse stencil technique
A reverse stencil protects the design shape while paint covers the area around it.
It works well for:
- Silhouettes
- Negative-space lettering
- Shadow effects
- Layered backgrounds
- Decorative borders
Multi-layer stencil technique
Multi-layer stencils divide a design into separate colour sections.
For accurate alignment:
- Add registration marks to every layer.
- Paint the background layer first.
- Allow it to dry as required.
- Align the second stencil using the same marks.
- Use light coats to avoid building thick ridges.
- Repeat for each colour.
Never cover registration marks until all layers are complete.
Shadow and offset technique
Spray the first layer in a darker colour. Move the stencil a small and measured distance, then apply the main colour.
The visible offset creates a simple shadow or dimensional effect.
Spray Paint Stencil Troubleshooting
| Problem | Likely cause | Practical solution |
| Fuzzy edges | Stencil lifted or spray was angled | Press the stencil flat and spray perpendicular to the surface |
| Paint bleed | Too much wet paint | Use shorter bursts and thinner passes |
| Runs or drips | Can was too close or movement stopped | Increase distance and keep your arm moving |
| Rough finish | Paint partly dried before landing | Move slightly closer and check temperature or wind |
| Uneven colour | Inconsistent speed or poor mixing | Shake again and overlap light passes |
| Missing detail | Narrow stencil section lifted | Hold the section down and spray it separately |
| Base paint peels | Base coat was weak or uncured | Allow full cure and test lower-tack material |
| Paint cracks | Incompatible coatings or recoat timing | Check both product labels and test compatibility |
| Stencil sticks | Paint was too thick or dried across the edge | Use thinner coats and adjust removal timing |
| Design smears | Stencil was dragged during removal | Lift vertically without sliding |
Common Spray Paint Stencil Mistakes
Applying one thick coat
A thick coat may appear faster, but it increases the chance of bleeding, runs, sticky stencil edges, and long curing times.
Ignoring surface preparation
Paint cannot form a reliable bond over oil, dust, loose rust, wax, or peeling coating.
Using permanent adhesive on a reusable stencil
Strong adhesive can leave residue, damage the surface, or make the stencil difficult to clean.
Use a product described as repositionable or suitable for temporary stencil placement.
Spraying in wind
Wind changes the direction of the paint mist and may lift lightweight stencils.
Move to a sheltered working area without blocking necessary ventilation.
Working in unsuitable weather
Extreme heat, cold, or humidity can change paint flow and drying.
Conditions vary between products. Follow the temperature and humidity limits printed on the can rather than relying on one universal range. Manufacturer instructions show that acceptable conditions can differ significantly between products.
Forgetting to protect the surrounding area
Overspray can settle well beyond the stencil. Masking only one or two inches around the design is rarely enough.
Reusing a dirty stencil
Dried paint buildup makes a reusable stencil uneven. It can also block fine details and prevent flat contact.
Clean the stencil according to its material and the type of paint used.
Real-World Uses for Spray Paint Stencils
Spray paint stencils can be used for:
- Wooden business signs
- Storage labels
- Workshop organisation
- Furniture decoration
- Canvas artwork
- Garden planters
- Concrete markers
- Wall borders
- Festival decorations
- Directional signs
- House-number boards
- Packaging displays
- Tool identification
- Sports equipment
- Multi-layer artwork
Always confirm that the design is suitable for the surface and that you have permission before painting walls, public property, rented spaces, equipment, or shared areas.
Frequently Asked Questions
Can you spray paint a stencil without paint bleeding?
Yes. Secure the stencil firmly, use a perpendicular spraying angle, and apply several light passes instead of one heavy coat. A smooth surface normally produces sharper edges than a heavily textured one.
How far should spray paint be from a stencil?
Start with the distance stated on the product label. Many general-purpose cans are used around 8–12 inches from the surface, but specialised stencil products may require a different distance.
Test the can on scrap material before spraying the project.
Should spray paint dry before removing the stencil?
It depends on the stencil and paint.
Reusable stencils are normally lifted after the paint has settled enough so that it won’t run. Adhesive stencils are often removed while the final layer is slightly wet or tacky so dried paint does not bridge across the edge.
Test the removal timing before working on the final piece.
Is stencil adhesive necessary?
No. Painter’s tape may be enough for simple designs on flat surfaces.
Repositionable adhesive becomes more useful for:
- Detailed designs
- Flexible stencils
- Curved surfaces
- Rough materials
- Large patterns
- Narrow internal bridges
Can reusable stencils be cleaned?
Most plastic reusable stencils can be cleaned, but the correct cleaner depends on the stencil and paint.
A strong solvent may damage, cloud, warp, or weaken thin plastic. Test the cleaning method on a corner first.
What is the best spray paint for stencils?
The best choice is paint that matches the project surface and provides a controllable spray pattern.
Look for:
- Surface compatibility
- Reliable nozzle control
- Suitable drying time
- Good coverage in thin layers
- The correct indoor or outdoor rating
- A finish that matches the project
Can you spray paint stencils on fabric?
Only use paint intended for fabric or textile projects. Standard spray paint may produce a stiff surface, crack during movement, or fail during washing.
Test washability and flexibility before completing a large fabric project.
Final Spray Paint Stencil Checklist
Before spraying, confirm that:
- The surface is clean and dry.
- The base coat has cured.
- The paint is suitable for the material.
- The stencil is correctly aligned.
- Every edge is secure.
- The surrounding area is covered.
- The work area is properly ventilated.
- Ignition sources have been removed.
- The can has been shaken.
- A test spray has been completed.
- You know the required recoat and curing times.
- You have planned how and when to remove the stencil.
The most dependable spray paint stencil techniques are based on control rather than speed. Keep the stencil flat, use less paint than you think you need, maintain a steady angle, and build the design through thin passes.
Your stencil material also affects edge sharpness, flexibility, reusability, and surface contact. Compare the available choices in our guide to the best stencil materials for spray painting.
Learn More
- Review the official Cricut Smart Stencil and Stencil Film instructions for cutting, weeding, transfer tape, and stencil placement.
- Read the EPA guide to VOCs and indoor air quality for ventilation and product-safety guidance.
- Check the manufacturer’s Montana Cans Stencil Spray application guide for an example of product-specific distance, shaking, layering, and weather instructions.
1 thought on “Spray Paint Stencil Techniques: The Complete Step-by-Step Guide”