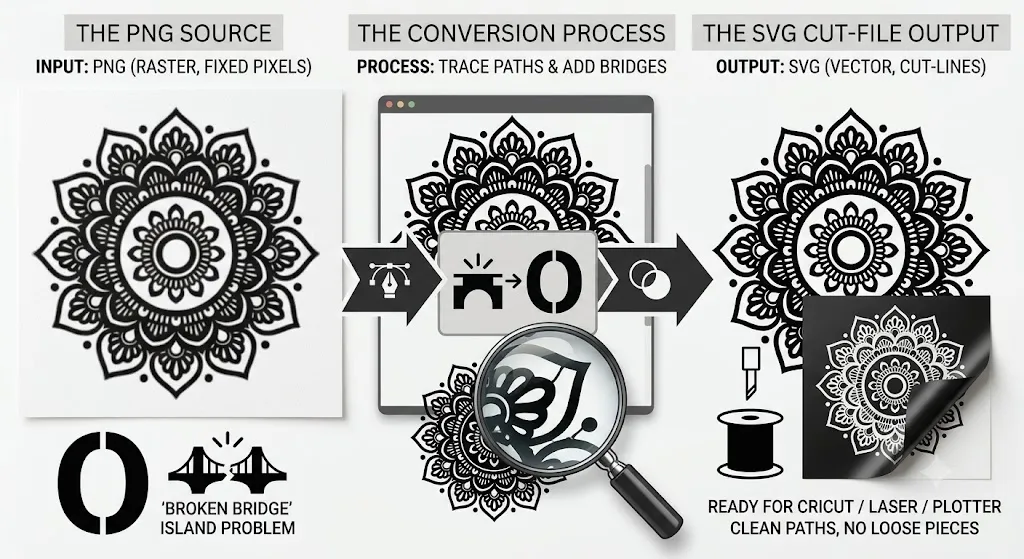
If you want to make reusable stencils for Cricut, Silhouette, laser cutting, vinyl cutting, acrylic sheets, paper crafts, wall art, or product templates, learning PNG to SVG conversion is one of the most important technical skills. A PNG image may look clean on your screen, but a cutting machine does not only need a picture. It needs clear cut paths. That is where SVG files become useful.
This guide belongs to the Stencil Making Tools & Techniques silo on digitalonday.com. For a complete foundation on stencil tools, materials, software, and cutting workflows, start with the pillar guide: Stencil Making Tools & Techniques Complete Guide.
A PNG is a raster image made from pixels. An SVG is a vector file made from paths, shapes, and points. For stencil making, this difference matters because machines and design software need clean outlines to cut accurately. Cricut Design Space, for example, treats PNG and SVG uploads differently: raster files such as PNG are uploaded as basic images, while SVG files are vector images that can preserve cut-ready layers when designed correctly.
In this complete guide, you will learn how PNG to SVG conversion works, which images convert well, how to clean your file before converting, which tools to use, how to avoid messy cut lines, and how to prepare your final SVG for stencil cutting.
What Is PNG to SVG Conversion for Stencils?
PNG to SVG conversion means turning a pixel-based image into a vector-based design. For stencil work, the goal is not only to make the file scalable. The real goal is to create clean, connected, machine-readable shapes that can be cut without tearing, missing details, or producing useless tiny fragments.
A normal PNG might include:
- A logo
- A silhouette
- A mandala
- A floral pattern
- A quote design
- A decorative border
- A scanned drawing
- A black-and-white artwork file
- A transparent-background image
But a stencil-ready SVG should include:
- Clean outer cut paths
- Smooth edges
- Properly connected bridges
- Removed background areas
- Simplified shapes
- Closed paths
- No unnecessary pixels
- No tiny floating pieces
- No embedded raster image pretending to be an SVG
This is where many beginners get stuck. They use a one-click PNG to SVG converter and assume the job is done. But a converted SVG is not always a stencil-ready SVG. For stencil making, you must check the structure of the design after conversion.
Why SVG Is Better Than PNG for Stencils
PNG files are useful for previews, mockups, print graphics, and simple image uploads. But SVG files are usually better for stencils because they are built from paths instead of pixels. Adobe explains that SVG is a vector format that can be resized without losing quality, while PNG images can become pixelated when enlarged.
For stencil cutting, SVG has several practical advantages:
- It creates cleaner cut lines.
- It scales better for small and large stencil sizes.
- It can separate design layers by shape or color.
- It is easier to edit in vector software.
- It works better for Cricut, Silhouette, laser cutters, and vinyl cutters.
- It allows you to remove unwanted nodes and simplify complex artwork.
- It helps avoid jagged edges caused by low-resolution PNG files.
However, SVG is not magic. If the original PNG is blurry, tiny, shaded, full of gradients, or low contrast, the SVG conversion may produce messy paths. The quality of the final stencil depends heavily on the quality of the original image.
PNG vs SVG for Stencil Making
PNG Files
These files are pixel-based images. These files can support transparent backgrounds and are commonly used for digital graphics. This format works well when you need an image preview or a print-style design, but it is not always ideal for clean cutting.
PNG is best for:
- Mockups
- Preview images
- Print then cut projects
- Simple image uploads
- Transparent-background graphics
- Sharing visual design concepts
PNG is weaker for:
- Scaling without quality loss
- Creating editable cut paths
- Layered stencil files
- Clean vinyl or Mylar cutting
- Detailed reusable stencil production
SVG Files
SVG files are vector-based. They are better for stencil making because they store shapes and paths. Cricut notes that vector images include SVG and DXF files and that layered vector files can automatically separate into layers after uploading and saving.
SVG is best for:
- Cricut stencil cutting
- Silhouette cutting
- Vinyl stencil files
- Mylar stencil production
- Laser-cut stencil templates
- Editable vector artwork
- Multi-layer stencil designs
- Reusable stencil files
SVG is weaker when:
- The conversion creates too many paths
- The design has unconnected floating pieces
- Text is not converted to outlines
- The file includes unsupported effects
- The SVG contains embedded raster images instead of real vector paths
Best Types of PNG Images to Convert Into SVG Stencils
Not every PNG makes a good stencil. Some images convert beautifully, while others become messy and unusable.
Best PNG Types for Conversion
Choose PNG images that are:
- High resolution
- Black and white
- High contrast
- Simple in shape
- Transparent background
- Clean-edged
- Not blurry
- Not heavily shaded
- Not photographic
- Built from bold outlines
Examples that usually convert well:
- Silhouette animals
- Simple floral outlines
- Logo marks
- Monograms
- Bold quote designs
- Basic icons
- Geometric patterns
- Mandalas with enough spacing
- Border patterns
- Single-color artwork
PNG Types That Convert Poorly
Avoid PNG images that are:
- Blurry
- Low resolution
- Full of gradients
- Highly detailed photos
- Too small
- Pixelated
- Full of shadows
- Watermarked
- Overlapping with messy backgrounds
- Made from thin, broken lines
If your PNG looks fuzzy before conversion, it will probably create fuzzy vector paths after conversion. The converter may trace every jagged pixel, which creates too many nodes and rough cutting lines.
Step-by-Step PNG to SVG Conversion Workflow for Stencils
Step 1: Choose a Clean PNG File
Start with the highest-quality PNG available. A 2000 px wide clean image is usually better than a 300 px image pulled from a compressed preview. For stencil work, clean edges matter more than decorative texture.
Before conversion, check:
- Is the background transparent or easy to remove?
- Are the edges sharp?
- Are the main shapes connected?
- Is the design readable at stencil size?
- Are there tiny details that will tear during cutting?
- Does the design need bridges?
If the PNG is weak, fix it before converting.
Step 2: Remove the Background
A stencil file should not include unnecessary background shapes. Remove the background before conversion whenever possible. If your PNG has a white background and black artwork, a converter may trace both the artwork and the background unless the file is cleaned correctly.
For Cricut users, Design Space includes upload tools that can remove unwanted background areas from raster images such as PNG files. Still, for cleaner stencil files, it is often better to remove the background before importing into Cricut.
Step 3: Convert the PNG to SVG
You can convert the PNG using an online converter, Adobe Express, Illustrator, Inkscape, or other vector software. Adobe Express offers a browser-based PNG to SVG converter that supports PNG, JPG, and JPEG files up to 40MB.
For simple black-and-white stencil designs, an online converter may be enough. For professional stencil files, Illustrator or another vector editor gives you more control.
Step 4: Open the SVG in Vector Software
After conversion, do not assume the file is ready. Open it in a vector editor and inspect the result.
Check for:
- Extra background paths
- Jagged outlines
- Too many nodes
- Broken curves
- Tiny floating pieces
- Unclosed paths
- Unwanted holes
- Duplicate shapes
- Hidden raster images
This step is where a basic SVG becomes a cut-ready stencil SVG.
Step 5: Simplify the Paths
A good stencil SVG should be clean and efficient. Too many anchor points can slow down software, create rough cuts, and make the cutter move unnecessarily.
Simplify by:
- Removing unnecessary nodes
- Smoothing curves
- Deleting tiny fragments
- Merging overlapping shapes
- Removing duplicate paths
- Cleaning hidden layers
- Converting strokes to outlines if needed
Adobe Illustrator’s Image Trace is designed to convert clean raster or high-contrast artwork into vectors, and Adobe describes it as useful for preserving edges and shapes from the original artwork.
Step 6: Add Stencil Bridges
This is the step many PNG to SVG tutorials forget. A normal vector design may look good, but a stencil needs bridges. Bridges are small connecting areas that keep inner shapes attached to the stencil sheet.
For example, if you cut the letter “O” without a bridge, the center island falls out. The same issue happens with letters like A, B, D, P, Q, R, and many decorative mandala or floral shapes.
Add bridges to:
- Letters with enclosed centers
- Mandala rings
- Flower centers
- Decorative holes
- Pattern islands
- Logo interiors
- Any floating shape that would fall out after cutting
A stencil-ready SVG is not just a traced SVG. It is a traced, cleaned, and structurally usable cut file.
Step 7: Test the File at Real Size
Resize the SVG to the actual stencil size before cutting. A design that works at 12 inches may fail at 3 inches because small details become too thin.
Ask:
- Are thin lines thick enough to cut?
- Are tiny holes too small?
- Will the bridges hold?
- Is the design readable from a distance?
- Will the stencil material tear?
- Is the file too complex for the machine?
For reusable stencil material like Mylar, avoid ultra-thin bridges. For vinyl stencils, you can use finer details, but weeding may become harder.
Step 8: Upload the SVG to Cutting Software
Upload the SVG to your cutter software, such as Cricut Design Space. Cricut’s official upload guide says SVG and DXF files go through the vector image upload flow, while PNG files go through the basic image upload flow.
After upload:
- Check the design size.
- Confirm the file appears as cut paths.
- Ungroup layers if needed.
- Attach or weld elements as required.
- Choose the correct material setting.
- Run a small test cut before cutting the full stencil.
For a deeper related tutorial, connect this article to: How to Make SVG Stencil Files for Cricut.
Best Tools for PNG to SVG Conversion
Adobe Express
Adobe Express is useful for quick PNG to SVG conversion. It is beginner-friendly and works in a browser. It is best for simple images, fast conversions, and users who do not need advanced path editing.
Best for:
- Quick conversion
- Simple PNG images
- Beginners
- Fast SVG download
- Basic design preparation
Limitations:
- Less control over nodes
- Not ideal for complex stencil bridge editing
- May still require cleanup in vector software
Adobe Illustrator
Adobe Illustrator is better for professional stencil conversion because you can trace, expand, simplify, edit, merge, and export clean SVG files. Illustrator’s Image Trace and vector editing tools give more control than most one-click converters.
Best for:
- Professional stencil files
- Logo conversion
- Multi-layer designs
- Path cleanup
- Commercial cut files
- Advanced node editing
Limitations:
- Paid software
- Learning curve for beginners
- Requires manual checking after tracing
Inkscape
Inkscape is a popular free vector editor. It can trace bitmap images, edit paths, simplify nodes, and export SVG files. It is a good choice for beginners who want more control without paying for software.
Best for:
- Free PNG to SVG conversion
- DIY stencil makers
- Simple vector cleanup
- Basic bridge editing
- Home craft businesses
Limitations:
- Interface may feel technical at first
- Auto-trace results still need cleanup
- Some SVG export settings may need testing with cutting software
Cricut Design Space
Cricut Design Space can upload PNG files and remove backgrounds, but it is not a full vector editing tool. It is better for final upload and cutting than advanced SVG cleanup.
Best for:
- Uploading PNG and SVG files
- Basic background removal
- Simple cut setup
- Cricut-ready previewing
- Final machine workflow
Limitations:
- Limited path editing
- Not ideal for complex bridge creation
- SVG files with unsupported items may fail
Cricut warns that SVG or DXF files can trigger unsupported-item errors when they contain elements such as pattern fills, clipping paths, editable text, linked images, or embedded unsupported images.
Common PNG to SVG Conversion Mistakes
Mistake 1: Using a Low-Resolution PNG
Low-resolution images create rough vector paths. Use a larger, cleaner PNG whenever possible.
Mistake 2: Forgetting to Remove the Background
If the background remains, the converter may trace a large unwanted box around the design.
Mistake 3: Assuming Every SVG Is Cut-Ready
Some SVG files are just containers with embedded images. A real cut-ready SVG should contain editable paths.
Mistake 4: Ignoring Stencil Bridges
A design can look perfect on screen but fail as a physical stencil if inner islands are not connected.
Mistake 5: Leaving Too Many Tiny Details
Tiny details create hard weeding, tearing, and messy cutting. Simplify the design for the material and size.
Mistake 6: Not Converting Text to Outlines
Editable text can cause upload or font substitution problems. Cricut recommends converting text into shapes before exporting files for Design Space.
Mistake 7: Exporting With Unsupported Effects
Gradients, patterns, clipping masks, and linked images can create problems. Use flat shapes for stencil files.
Problem-Solution Guide
Problem: My SVG Uploads as One Solid Shape
Solution: The background may still be included, or the trace created a filled compound shape. Reopen the SVG, delete the background path, and check whether the artwork is separated correctly.
Problem: Cricut Says the SVG Has Unsupported Items
Solution: Remove pattern fills, clipping paths, editable text, and linked images. Convert text to outlines and flatten the design into clean vector shapes.
Problem: The Cut Lines Look Jagged
Solution: Start with a higher-resolution PNG, increase contrast, and simplify the traced paths. Avoid converting pixelated images.
Problem: Small Pieces Fall Out of the Stencil
Solution: Add bridges to enclosed areas. Any isolated interior shape needs a connector if you are cutting a physical stencil sheet.
Problem: The File Is Too Slow or Heavy
Solution: Reduce nodes, delete hidden layers, simplify curves, and remove tiny details that do not improve the final stencil.
Problem: The Stencil Tears During Cutting
Solution: Increase bridge thickness, simplify delicate areas, choose a stronger material setting, or enlarge the design.
Practical Tips for Better Stencil SVGs
Use these tips before exporting your final file:
- Use bold shapes instead of hairline details.
- Keep bridges thick enough for the stencil material.
- Avoid tiny decorative dots unless the stencil is large.
- Use high-contrast black-and-white artwork.
- Remove all unnecessary background areas.
- Test cut a small section before cutting the full design.
- Save a master editable file before exporting SVG.
- Keep one simplified version for cutting and one detailed version for preview.
- Label your layers clearly.
- Avoid overcomplicated paths for reusable stencil material.
For another same-silo tutorial, link to: Best Stencil Fonts for Cricut and Cutting Machines.
People Also Ask
Can I convert any PNG to SVG for stencils?
Technically, many PNG files can be converted, but not all will become good stencil files. Clean, high-contrast, simple PNG files convert best. Photos, gradients, blurry screenshots, and tiny low-resolution images usually need heavy cleanup.
Is SVG always better than PNG for Cricut stencils?
For cut files, SVG is usually better because it can contain editable vector paths. PNG can work for basic uploads, but SVG gives more control over cutting, scaling, layers, and cleanup.
Why does my converted SVG look messy?
The original PNG may be low quality, too detailed, or shaded. Auto-tracing can create too many nodes and rough edges. Clean the PNG first, then simplify the vector after conversion.
Do I need Illustrator to convert PNG to SVG?
No. You can use Adobe Express, Inkscape, or online converters. However, Illustrator gives more professional control for path cleanup, tracing, and export settings.
What makes an SVG stencil-ready?
A stencil-ready SVG has clean paths, connected bridges, removed backgrounds, simplified shapes, closed outlines, and no unsupported effects. It must work as a physical cut stencil, not just a nice digital graphic.
Real-World Use Cases
Vinyl Stencils
Vinyl stencils can handle more detail than thick reusable stencil sheets, but small pieces may be difficult to weed. Use clean SVG paths and avoid tiny disconnected shapes.
Mylar Stencils
Mylar stencils need stronger bridges and simpler details. Thin lines may tear or lift during use.
Wall Painting Stencils
Wall stencils should be bold and readable from a distance. Avoid overly tiny details that disappear when painted.
Logo Stencils
Logo PNGs often convert well if they are high contrast. After conversion, simplify the paths and check that letters with enclosed centers have bridges.
Quote Stencils
Quote stencils need stencil-safe fonts. Script fonts may look beautiful but can create fragile connections. Use thicker fonts or manually add bridges.
Final Checklist Before Exporting SVG
Before saving your final SVG, check:
- Background removed
- Paths are editable
- Text converted to outlines
- Bridges added
- Small pieces removed
- Curves smoothed
- Duplicate paths deleted
- File tested at real size
- Material thickness considered
- Upload tested in cutting software
A clean SVG saves time, reduces wasted material, and creates a better final stencil.
Learn More and References
For official upload behavior in Cricut Design Space, read the Cricut image upload guide.
Quick browser-based conversion, Adobe provides a free PNG to SVG converter through Adobe Express.
Professional vector cleanup and tracing, Adobe explains Illustrator’s Image Trace and vectorize image tools.
Conclusion
PNG to SVG conversion for stencils is more than changing a file extension. A good stencil SVG needs clean paths, strong bridges, removed backgrounds, simplified shapes, and cutter-friendly structure. One-click converters can help, but the best results come from checking and editing the vector file before cutting.
For the full technical foundation, continue with the pillar guide: Stencil Making Tools & Techniques Complete Guide. Then explore related tool-focused tutorials like How to Make SVG Stencil Files for Cricut and Best Stencil Fonts for Cricut and Cutting Machines to build a complete stencil-making workflow.
3 thoughts on “PNG to SVG Conversion for Stencils:(Beginner Guide for Clean Cut Files)”