Introduction
Stenciling looks simple: place the stencil, apply paint, lift it, and admire the design. In practice, small mistakes can create paint bleed, fuzzy edges, uneven coverage, shifted patterns, torn details, or damaged stencil material. The good news is that most stencil problems are technique problems rather than permanent failures.
A stencil works by controlling where paint or another medium reaches the surface. The cut openings create the visible pattern while the solid stencil material blocks the rest. That means clean results depend on three things working together: a stable stencil, controlled material application, and a suitable surface.
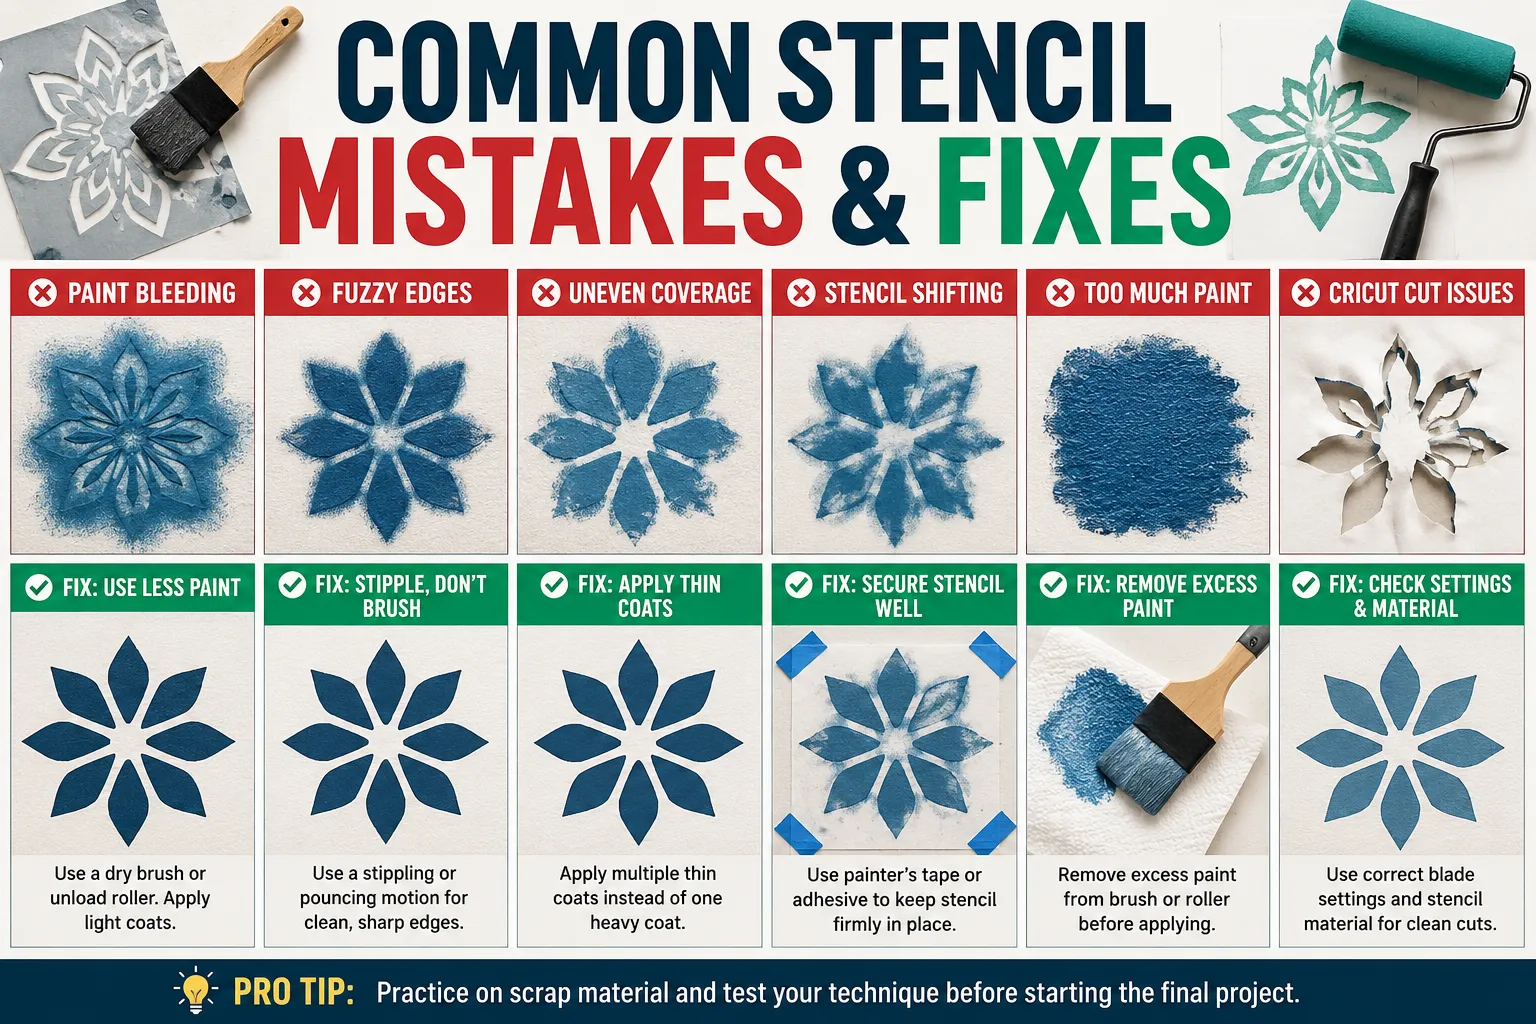
This troubleshooting guide focuses on the mistakes beginners make most often and, more importantly, explains why each mistake happens, how to repair it, and how to prevent it next time. For the complete workflow, connect this guide with the Stencil Making Tools & Techniques Complete Guide, your main resource for choosing materials, cutting methods, and application techniques.
Whether you are painting a wall, decorating wood, making fabric crafts, creating a Cricut stencil, or preparing a design for digital cutting, the same principle applies: precision starts before the paint ever touches the stencil.
What Are the Most Common Stencil Mistakes?
The most common stencil mistakes are:
- Paint bleeding under stencil edges
- Fuzzy or soft outlines
- Uneven or patchy coverage
- Stencil shifting during application
- Paint pooling inside detailed areas
- Torn stencil bridges or fragile details
- Misaligned repeated patterns
- Poor results caused by a rough or dirty surface
- Stencil lifting when paint is applied
- Cricut cuts that are too shallow, too deep, or incomplete
- Difficulty removing intricate designs during weeding
- Smudging while lifting the stencil
- Poor results from using the wrong paint consistency
- Visible ridges from applying too much material
- Design distortion caused by stretching or bending the stencil
Most of these issues have a simple root cause: too much paint, too much pressure, too much movement, poor surface preparation, or an unsuitable stencil design.
1. Paint Bleeding Under the Stencil
Paint bleed is probably the most recognizable stencil problem. It happens when paint travels underneath the stencil instead of staying inside the intended openings. The result is a soft, fuzzy, or irregular edge.
Current stencil tutorials consistently identify excessive paint, loose stencil contact, rough surfaces, and incorrect application pressure as major causes of bleeding.
Why does paint bleed under a stencil?
Several factors can combine to cause it:
- The brush or roller is overloaded.
- Paint is too thin or wet.
- The stencil is not held firmly against the surface.
- The surface contains bumps, dust, texture, or grease.
- The brush is pushed sideways instead of used with controlled dabbing.
- A roller carries too much paint into stencil openings.
- Spray paint is applied too heavily.
How to fix paint bleed
Do not immediately repaint the entire project. First allow the affected area to settle or dry enough to prevent further smearing.
For a small mistake, use a fine detail brush with the original background color to carefully cover the unwanted paint. For a larger mistake, repaint the background section, let it dry completely, then reapply the stencil.
A useful repair strategy is background-color correction. Instead of trying to erase every mistake, cover the bleed with the background color and restore the design with a thin top layer.
How to prevent bleeding
Use a lightly loaded brush or dense foam roller. Remove excess paint onto scrap paper, cardboard, or a paper towel before touching the stencil. Multiple thin coats are generally safer than one heavy coat. HGTV similarly recommends unloading paint from the roller before application because excess paint is a major source of bleed.
For additional stencil protection, keep the stencil flat and secure. Tape can hold the perimeter while repositionable adhesive can improve contact, especially around intricate designs. Smooth, clean surfaces also reduce the small gaps through which paint can travel.
2. Fuzzy or Soft Stencil Edges
Even when paint does not visibly leak, your design may still look blurry. This often happens when paint is pushed beneath the stencil edge or when the stencil itself moves during application.
Fix for fuzzy edges
Start by identifying whether the problem is paint quantity or stencil movement.
If the pattern stayed in one position but the edges look soft, reduce the amount of paint and pressure. If you see a slight double image or offset outline, the stencil probably shifted.
Use a small brush to sharpen edges after the paint dries. For severe errors, repaint the background and stencil the area again.
Prevention
Apply paint vertically with a controlled stippling or pouncing motion rather than aggressively brushing toward the stencil edge. Several stencil specialists recommend reducing pressure and avoiding movements that force paint beneath the template.
A useful rule is simple: let the stencil define the edge; do not force paint into it.
3. Uneven or Patchy Paint Coverage
Sometimes the stencil edges are crisp, but the filled areas look inconsistent. One part is dark while another looks faded.
This usually means the paint layer was applied unevenly.
Common causes
The brush may have too little paint, the surface may absorb differently in different areas, or the first coat may simply be too thin.
The correct fix
Do not compensate by flooding the entire stencil with more paint. Let the first layer dry, inspect the coverage, and apply a second thin coat where needed.
This approach is especially useful for:
- Wood
- Canvas
- Fabric
- Matte painted walls
- Porous craft surfaces
Multiple controlled passes provide greater consistency than trying to achieve full opacity in one application.
4. The Stencil Moves While You Paint
A moving stencil can ruin an otherwise perfect design. Even a few millimeters of movement may create doubled edges, shadows, or distorted shapes.
Why does the stencil move?
Common reasons include:
- Insufficient tape
- Weak or unsuitable adhesive
- Curved surfaces
- Excessive brush pressure
- Painting too aggressively
- Working on a dirty surface
How to fix it
Stop immediately when you notice movement. Continuing to paint usually makes the error worse.
Realign the stencil with the original registration points or surrounding design. Secure it again before applying additional paint.
For repeating patterns, establish clear alignment marks before beginning. Cricut’s official stencil workflow also emphasizes securing and applying the stencil material properly after cutting and weeding.
For the next project, see How to Make Stencils With Cricut for a cutting-to-application workflow designed around machine-cut stencil material.
5. The Stencil Lifts at the Edges
A stencil may look secure in the center but curl upward around corners, curves, or detailed sections.
Once an edge lifts, paint can easily travel underneath it.
Fix
Press the stencil back down only if the paint has not contaminated the surrounding edge. If paint has already entered the gap, stop and clean the area before continuing.
On a complex design, smaller pieces of tape may hold corners more effectively than one long strip.
Prevention
Clean the surface before applying the stencil. Dust and grease can prevent proper contact, while rough areas can create channels for paint to seep underneath.
If the surface is curved or heavily textured, consider using a more flexible stencil material or simplifying the design.
6. Too Much Paint Creates Thick, Raised Edges
A common beginner assumption is that more paint produces a better stencil. It usually does the opposite.
Heavy application can create:
- Bleeding
- Thick raised edges
- Long drying times
- Detail loss
- Uneven texture
- Difficult stencil removal
A dense foam roller can work well for broad areas, but it must be unloaded before it reaches the stencil. A heavily loaded roller can carry paint underneath the template.
Better method
Load lightly, remove excess, apply one controlled layer, then repeat if necessary.
Think of stencil painting as building opacity, not flooding the design.
7. Painting With the Wrong Brush Motion
A sideways brushing motion is one of the easiest ways to push paint beneath stencil edges.
Better technique
Use one of these controlled movements:
Pouncing: Tap paint vertically onto the stencil.
Stippling: Repeatedly dab with a controlled amount of paint.
Light rolling: Roll gently over the stencil with an unloaded foam roller.
Avoid aggressive scrubbing or dragging paint sideways across stencil openings.
This small change can make a dramatic difference because the goal is to place paint through the opening, not push it horizontally underneath the material.
8. The Surface Is Too Rough, Dirty, or Glossy
Stencil quality is strongly influenced by the surface underneath it.
A rough surface creates tiny spaces beneath the stencil. Dust prevents full adhesion. Grease can make paint spread unpredictably. Very glossy finishes may also change how quickly the paint settles.
Current guidance from stencil specialists consistently recommends cleaning and, where appropriate, smoothing or preparing the surface before stenciling.
Fix
Clean the surface and let it dry completely.
For wood, sanding may help create a smoother base. For walls or furniture, a suitable base coat can help create a more consistent painting surface.
Always test your full stencil process on a scrap section before committing to a visible area.
9. The Stencil Tears During Weeding
Machine-cut stencils can contain very small bridges, narrow lines, and delicate corners. These details are especially vulnerable during weeding.
Why does this happen?
The design may simply be too intricate for the chosen material, blade setting, or stencil size.
The cut may also be too deep or too shallow, making removal difficult.
How to prevent it
Simplify extremely small details before cutting. Increase the size of fragile features when creating the stencil design.
When working in a digital design program, inspect the smallest openings and bridges before exporting. Vector artwork is particularly useful because scalable paths can be adjusted before cutting. Adobe Illustrator supports vector workflows and image-to-vector conversion for editable artwork.
For more digital preparation guidance, see How to Convert an Image Into a Stencil SVG.
10. Cricut Cuts Are Not Clean
Cricut stencil problems can look like paint mistakes, but sometimes the real issue starts during cutting.
Common Cricut cutting problems
- Material is not secured properly.
- Blade pressure is unsuitable.
- The design contains fragile details.
- The wrong stencil material is selected.
- Small internal shapes are too detailed.
- The mat has poor grip.
- The material has lifted during cutting.
Cricut’s current official instructions distinguish between stencil films and machine-compatible Smart Stencil materials and outline the basic design, cutting, weeding, and application workflow.
Fix
Start with the material manufacturer’s recommended settings and perform a test cut. If small details tear, simplify the design or increase the size of fragile features.
A perfect digital design can still produce a poor physical stencil when its smallest components are too delicate to cut and weed reliably.
11. The Stencil Gets Smudged When You Lift It
Removing the stencil at the wrong time can turn a clean pattern into a blur.
What causes this?
Usually one of three things:
- The paint is too wet.
- The stencil is dragged rather than lifted.
- The stencil is accidentally shifted across wet paint.
Better removal technique
Lift the stencil carefully and steadily without sliding it across the surface. On some projects, removing it while the paint is still workable can prevent paint from forming a strong bond along the stencil edge, but the exact timing depends on the paint and surface.
The key is controlled movement: lift, do not drag. Recent stencil guidance similarly recommends lifting straight up rather than sliding the stencil sideways.
12. Repeated Patterns Do Not Line Up
Repeated stencil designs require more than good paint technique. They require measurement and alignment.
A beautiful pattern can still look unprofessional if each repeat gradually drifts upward, downward, or sideways.
Fix
Use registration marks, guides, or visible repeat points to establish consistent spacing.
Before applying paint to a large project, test two or three repeats on scrap material. Check:
- Spacing
- Orientation
- Edge alignment
- Rotation
- Pattern scale
For wall patterns, always plan the starting point before moving across the surface. A small alignment error at the beginning can become a major mismatch by the final repeat.
13. Fine Details Fill In With Paint
Detailed stencil designs are attractive, but very small openings are difficult to paint cleanly.
The smaller the opening, the more important paint control becomes.
Fix
Use less paint and a more controlled tool. Consider reducing the number of tiny openings in the digital design before cutting.
For machine-made stencils, simplify unnecessary micro-details. A design can look excellent on a screen but fail as a physical stencil because paint, material thickness, and application technique impose real-world limits.
This is one reason stencil design should always be treated as a manufacturing problem, not just a graphic design problem.
14. Paint Sticks to the Stencil
Sometimes the paint forms a film on the stencil and begins lifting with it.
This can happen when paint is too thick, too dry, or applied excessively.
Fix
Reduce paint thickness and avoid long delays between application and stencil removal when the chosen paint is prone to bonding.
Clean the stencil between sections when necessary. Dried residue can also change how flat the stencil sits during the next application.
Regular cleaning is especially important when using reusable stencils because accumulated paint can create raised spots that make future bleeding more likely.
15. You Chose the Wrong Stencil Design for the Surface
Not every stencil works equally well on every material.
A highly detailed stencil may be excellent for a flat, smooth surface but frustrating on rough wood, textured walls, curved objects, or fabric.
Better approach
Match the stencil to the surface.
For beginners, larger shapes and fewer tiny details are easier to manage. On fabric, the material may move unless it is supported underneath. University of Tennessee Extension guidance recommends stabilizing fabric with a firm backing and securing the stencil before painting.
This illustrates a broader rule: design for the surface, not just for appearance.
How to Repair a Bad Stencil Without Starting Over
A failed stencil does not always mean the entire project is ruined.
A practical repair sequence is:
Step 1: Stop painting
Do not continue adding paint to an already damaged area.
Step 2: Assess the damage
Determine whether you have:
- Bleeding
- Smudging
- Misalignment
- Uneven coverage
- Torn material
- Surface damage
Step 3: Let the area reach a workable state
Depending on the paint, you may need to clean a fresh mistake or allow a dried mistake to cure before repainting.
Step 4: Repair with the background color
Small bleeds are often easiest to hide using the original background color.
Step 5: Reapply the stencil
Secure it carefully, reduce paint quantity, and correct the application method.
Step 6: Inspect before repeating
Do not assume the same technique will suddenly work. Change the actual cause of the failure.
A dedicated stencil repair article from StudioR12 also highlights several practical recovery options, including detail-brush correction, careful water cleanup when appropriate, sanding for suitable projects, and re-basecoating when necessary.
A Quick Stencil Troubleshooting Checklist
Before starting:
- Clean and dry the surface.
- Smooth rough areas where practical.
- Test the stencil on scrap material.
- Check the smallest details.
- Secure the stencil.
- Prepare only a small amount of paint.
During application:
- Remove excess paint.
- Use light pressure.
- Dab or stipple instead of scrubbing.
- Watch the stencil edges.
- Inspect the first section before repeating the method.
After application:
- Lift carefully.
- Check for bleed immediately.
- Correct small errors before they become difficult repairs.
- Clean the stencil before paint residue hardens.
- Store the stencil flat or protected from distortion.
People Also Ask: Stencil Mistakes & Fixes
Why does my stencil bleed even when I use tape?
Tape prevents movement but does not automatically stop paint from flowing under the stencil opening. Excess paint, surface texture, and pressure can still cause bleed. Use less paint and improve stencil-to-surface contact.
What is the best way to stencil without bleeding?
Use a clean, reasonably smooth surface, secure the stencil, unload the brush or roller, and apply thin layers with controlled pressure. These are the recurring fundamentals across current stencil guidance.
Can I fix paint bleed after it dries?
Yes. For small areas, touch up with the background color. For larger errors, repaint the affected area, allow it to dry, and stencil again.
Why does my Cricut stencil tear?
The design may contain details that are too small for the chosen stencil material, or the cutting settings may not be suitable. Test cuts and simplified geometry can help.
Should I use more paint for better coverage?
Usually no. Two or more thin layers are generally easier to control than one heavy layer and reduce the risk of bleeding.
Why are my stencil edges fuzzy?
Fuzzy edges usually indicate paint movement, excessive paint, pressure, a lifted stencil edge, or a textured surface.
How do I stop a stencil from moving?
Use appropriate low-tack tape or repositionable adhesive, make sure the surface is clean, and avoid applying excessive sideways pressure during painting.
Best-Practice Formula for Clean Stencils
A reliable stencil workflow can be simplified into one formula:
Clean surface + flat stencil + secure edges + low paint load + light pressure + thin coats + careful removal = sharper stencil results.
The biggest lesson is that professional-looking stencil work rarely comes from one special product. It comes from controlling the variables that affect the final edge.
When the result goes wrong, do not simply add more paint, press harder, or repeat the same method. Diagnose the failure first.
That troubleshooting mindset is especially valuable when you are making stencils digitally. A cutting machine can reproduce a design consistently, but it cannot compensate for poor geometry, fragile bridges, unsuitable material settings, or a difficult application surface.
For a complete start-to-finish workflow, continue to the Stencil Making Tools & Techniques Complete Guide. For machine workflows, compare it with How to Make Stencils With Cricut, and for digital preparation, use How to Convert an Image Into a Stencil SVG.
Final Takeaway
Most common stencil mistakes are preventable. Paint bleed usually comes from excess paint, poor contact, surface texture, or excessive pressure. Fuzzy edges often come from movement or sideways application. Uneven coverage usually needs thinner, repeated coats rather than heavier paint.
Cricut users have another layer of quality control: the digital design, stencil material, cutting settings, weeding process, and physical application must all work together.
The smartest approach is not to chase perfection after the mistake happens. Build a workflow that prevents the mistake in the first place. Test your surface, simplify difficult designs, secure the stencil, control paint quantity, and inspect each stage before moving forward.
With those habits, stencil making becomes far more predictable, whether you are creating References
- What Is a Stencil? — Wikipedia definition and background: Stencil definition and background
- Cricut Smart Stencil / Stencil Film Instructions — official material, cutting, weeding, and application guidance: Cricut official stencil instructions
- Adobe Illustrator Vector Artwork Help — useful for preparing editable vector designs for stencil workflows: Adobe Illustrator vector artwork guidance