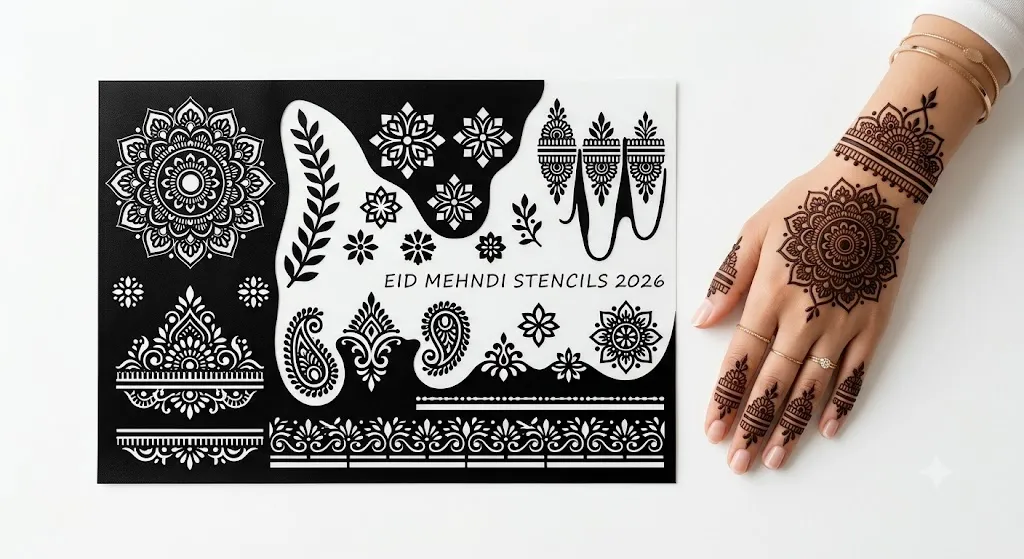
Choose an Eid pattern that fits your hand
For an easy Eid mehndi stencil design, start with a small crescent, an open floral trail, or a simple palm mandala. Choose the placement before buying the stencil: a beautiful flat pattern can become difficult to use if its edges cross finger joints or bunch around the wrist. One clear motif with space around it is a useful starting point for Chand Raat.
This 2026 guide compares seven design options and explains how to adapt them for the palm, back of the hand, fingers, and wrist. The focus is choosing a workable layout, checking the stencil fit, and avoiding blurred details. These are design suggestions, not a ranking of the year’s most popular patterns.
Compare seven Eid mehndi stencil designs
Use this table to narrow your choice. “Simpler” means fewer separate pieces or easier positioning; it does not promise a particular application or drying time.
| Design | Suggested placement | Fitting difficulty | Check before applying |
|---|---|---|---|
| Crescent and dots | Back of hand | Simpler | Keep the narrow moon tips open and separated. |
| Arabic floral trail | Wrist toward one finger | Moderate | Check for lifting where the trail crosses a knuckle. |
| Open mandala or gol tikki | Palm center | Simpler | Choose clear petal openings rather than tiny lace details. |
| Bracelet and center charm | Above wrist crease | Moderate | Test the curve before joining separate sections. |
| Finger bands | One or two fingers | Moderate | Leave the bending crease clear. |
| Paisley with leaf accent | Side of palm or back of hand | Moderate | Check the thin curled tip and interior gaps. |
| Single flower with dots | Back of hand | Simpler | Leave enough space between petals for the pattern to read clearly. |
1. Crescent and dots for a Chand Raat look
Place one crescent slightly off-center on the back of the hand, then use a short arc of dots to balance the open side. Keep the surrounding skin mostly empty. This gives the moon a clear outline without needing stars, lanterns, flowers, and lettering in the same small area.
When comparing stencil sheets, inspect the tips of the crescent. If they are extremely narrow, filling them evenly may be harder than filling the wider middle. Choose a bolder moon for your first attempt; add separate dots only after the main placement is settled.
2. Arabic floral trail for the back of the hand
Build the layout around one main flower near the wrist or hand center, with a curved leaf trail toward one finger. The diagonal arrangement leaves open space on either side, which helps the individual shapes stay readable.
Dry-fit the whole trail with the backing still attached. If the sheet wrinkles over a knuckle, look for a shorter design or a set with separate flower and finger pieces. Our Arabic-style pattern collection offers more ways to arrange flowers, vines, and finger details.
3. Open mandala or gol tikki for the palm
A round central motif gives a balanced starting point for front-hand mehndi. Choose a small center with one clear ring of petals, then leave a gap before any fingertip decoration. A stencil with several tightly packed rings can be harder to fill without joining neighboring shapes.
Check the fit with your palm relaxed. Stretching the hand wide to fit a large circle can pull against the adhesive when you relax it again. A smaller circle that sits naturally is a better fit than a detailed design that needs constant repositioning.
4. Bracelet and charm above the wrist
Try a short wrist band with one central flower or crescent, rather than a full wraparound cuff. Position it above the deep wrist fold and check where your bangles or sleeve will sit. Leave enough room for clothing and jewelry to avoid touching the paste.
If you want a connection toward the middle finger, use a separate short trail. Align the center of the charm with the intended finger before applying either piece; otherwise the connecting line may drift sideways.
5. Finger bands with an undecorated palm
One narrow band and a short leaf strip on one or two fingers create a restrained Eid look. Finger-only designs cover less skin, but their curved placement is not automatically easier. Avoid wrapping a wide stencil over a joint.
Compare each strip with the usable space between creases before peeling the backing. For a first attempt, choose a flat-facing motif on the back of the finger instead of a complete ring that must meet neatly underneath.
6. Paisley with one leaf accent
Use a single paisley on the side of the palm or at the outer edge of the back of the hand. Point its curled end toward the fingers and balance the wider end with one small leaf group. This creates direction without needing a full-hand arrangement.
Look closely at the narrow spaces inside the paisley. A clear opening is easier to fill than a tightly curled channel. If the design only looks distinct when enlarged on a screen, check its actual printed size before choosing it.
7. Single flower with a dotted border
A flower with broad petals and a short dotted border is a simple option when you want one focal point. Place it on the back of the hand and stop before adding a second large motif. It also works as a shared theme for a group: each person can choose their own placement without needing identical hand sizes.
For small hands, simplify the pattern instead of shrinking every detail. A small design is not evidence that a henna product or adhesive is suitable for a child; check the product’s ingredients, age guidance, and warnings separately.
Check the stencil before Chand Raat
A design reference, a transfer tattoo, and a cut-out henna stencil are different products. A picture shows how a pattern should look; a cut-out stencil exposes the skin where paste will go. Check that the product you order actually includes the stencil material and the instructions you need.
- Measure the usable area. Compare the listed motif width and length with the space on your relaxed hand, rather than the overall sheet size.
- Check left and right hands. A directional trail may need a mirrored partner. Do not assume one adhesive piece can be flipped over and reused.
- Inspect the openings. Tiny petals, narrow curls, and closely spaced dots need more control than a broad flower or crescent.
- Check the material and adhesive. Use a product intended for the proposed skin application. Ordinary craft vinyl or craft spray adhesive is not a substitute.
- Read reuse instructions. Some pieces are single-use. “Reusable” does not mean the adhesive will stay effective after any cleaning method.
For a first practice layout, our beginner pattern guide can help you start with fewer pieces and larger openings.
Apply the stencil without blurring the pattern
Follow the instructions supplied with both the stencil and the paste. Different products can have different removal and aftercare requirements, so a fixed “15 minutes for fingers” or “30 minutes for mandalas” rule is unreliable.
- Plan the placement. Hold the backed stencil over your relaxed hand. Check creases, sleeve edges, jewelry, and the direction of the design.
- Prepare the skin as directed. It should be clean and dry, without lotion or oil where the adhesive must grip. Do not apply over irritated or damaged skin.
- Attach without stretching. Lay the stencil down gradually and gently press around the openings. Replace a piece that will not sit flat rather than covering a lifted edge with more paste.
- Fill each opening evenly. Use controlled pressure and enough paste to cover the exposed design. Avoid flooding the sheet or pushing paste sideways under its edges.
- Keep the hand supported. Rest it comfortably while the product sets. Avoid bending fingers or turning the wrist to inspect the design repeatedly.
- Remove according to the product directions. Peel gently and keep the loose stencil from falling back onto the design. Stencil removal and paste removal are not necessarily the same step.
Use the directions for the product you actually have, rather than combining steps from unrelated kits. Our home application walkthrough covers preparation and handling in more detail.
Plan for stain development, not just application time
Choosing a small design can reduce the amount of positioning and filling, but it does not make the henna stain develop instantly. Application time, paste drying, and final color development are separate stages.
Henna Caravan’s cone instructions describe an initially orange stain that darkens over about 48 hours. Results vary with the paste, placement, and aftercare. If color matters for Eid photos, allow for the product’s development period instead of applying immediately before the event and expecting the final shade.
Fix common stencil problems
| Problem | Check | Practical adjustment |
|---|---|---|
| Blurred edges | Lifted stencil edges or excess paste | Choose a flatter placement and fill openings without pushing paste under the border. |
| Flower petals merge | Details too small at the chosen size | Use fewer, wider-spaced petals instead of adding more paste. |
| Gaps in the pattern | Openings not fully filled or movement during application | Check coverage before removal; keep the hand supported. |
| Adhesive lifts at a joint | Crease, moisture, oil, or a poor fit | Use a smaller piece away from the bending point. |
| Stain looks orange at first | The product’s expected color-development period | Allow the stated development time before judging the result. |
Check henna and adhesive safety
A neat stencil does not establish that its paste or adhesive is safe. Read ingredient lists and warnings, and avoid “black henna” or hair dye used as skin decoration. The FDA’s henna and temporary tattoo guidance warns that black henna may contain PPD, which can cause dangerous skin reactions. “Natural” is not a guarantee against a reaction.
For US readers, the FDA also states that henna is approved as a hair dye, not for direct skin application. Follow local guidance and product restrictions. Stop using a product if irritation develops; seek medical advice for a reaction. Children need adult supervision and products appropriate to their age.
Questions about Eid mehndi stencils
Which pattern is easiest for a first attempt?
Choose a single flower, an open mandala, or a broad crescent that fits a relatively flat area. Fewer pieces and clearly separated openings are more useful than a “beginner” label on a very detailed sheet.
Should I choose front-hand or back-hand mehndi?
Choose the palm for a centered round motif, or the back of the hand for a diagonal floral trail. Test the actual stencil against your relaxed hand: the best placement is where its openings lie flat without stretching the sheet.
Can I print a picture and use it as a henna stencil?
A printed picture is a visual reference, not a ready-to-use adhesive stencil. A usable cut-out needs open areas for paste and material appropriate for the application. Do not treat a decorative illustration as a tested cutting template.
Can I reuse an Eid stencil?
Only if its manufacturer says it is reusable and explains how to clean and store it. Discard a piece with damaged edges or adhesive that no longer holds reliably. A distorted stencil can change the pattern even when the paste is applied carefully.
To compare these layouts with other occasions, explore the festive stencil design guide.
1 thought on “Eid Mehndi Stencil Designs 2026: 7 Easy Patterns for Hands”