
Introduction
Laser cutting Mylar stencils can produce clean, reusable designs, but too much heat often causes melted edges, warping, or distorted details. The best results come from using the right Mylar thickness, controlled laser power, faster cutting speeds, and proper focus. It is also important to test a small sample first and confirm that your specific Mylar sheet is suitable for laser cutting. This guide explains how to laser cut Mylar stencils with sharper edges, less heat damage, better accuracy, and safer machine settings for more consistent stencil results.
The cleanest Mylar cut usually comes from less heat, not more power
When a laser-cut stencil has rounded holes, shiny fused edges, brown residue, or a wavy surface, the problem is usually excess heat staying in the film. Thin polyester can cut very quickly, so a slow high-power pass may melt more material than it removes. The goal is to use only enough energy to separate the sheet cleanly while keeping the surrounding stencil cool and flat.
There is no universal power-and-speed setting because laser type, wattage, focus, optics, material thickness, color, bed style, and air assist all change the result. Use your machine manufacturer’s material guidance and build a small test grid instead of copying a number from another machine. If you need the broader setup first, see the laser cutter settings for stencils guide.
Confirm the material before putting it in a laser
Do not assume every clear craft sheet sold as stencil plastic is laser-safe. Mylar is a polyester PET film, while products described loosely as vinyl may contain PVC. PVC and other chlorine-containing materials should not be laser cut because heating them can release dangerous corrosive gases and damage equipment.
What melted edges are telling you
| Symptom | Likely cause | First adjustment |
|---|---|---|
| Rounded or glossy edges | Too much heat per millimeter | Increase speed or reduce power |
| Cutouts fuse back into sheet | Molten edges cooling together | Reduce heat and improve separation |
| Brown or dark edge | Overheating or residue | Use a lighter/faster pass |
| Sheet waves or curls | Heat buildup across a large area | Use faster passes and better hold-down |
| Incomplete cuts | Too little energy or poor focus | Check focus, then add a small amount of energy |
| Tiny details disappear | Kerf larger than the feature | Enlarge details or reduce heat |
Start with a small test grid
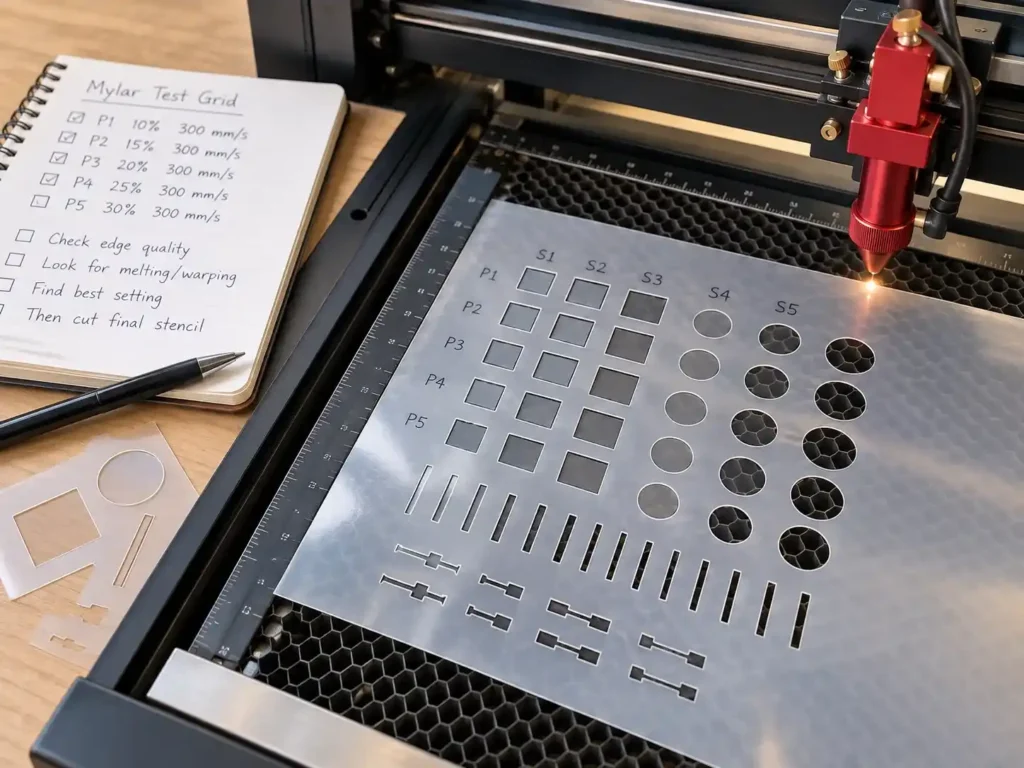
Do not begin with the final stencil. Create a test file that includes a square, circle, narrow slot, small island, and at least one bridge similar to the real design. Test several speed-and-power combinations on a scrap piece from the same sheet batch.
Change one variable at a time. If the first cut does not go through, do not jump straight to maximum power. Check focus and flatness first. Then increase energy in small steps. If the edge is melted, move in the opposite direction: less power, more speed, or multiple lighter passes if your machine and material support that approach.
Keep the Mylar flat across the bed
Thin film can lift from airflow or heat. Once the sheet rises out of focus, the cut becomes wider and less consistent. Secure the perimeter with a laser-safe hold-down method approved for your machine. Magnets are used on some metal honeycomb beds, while other machines use pins, jigs, or low-profile weights outside the laser path.
Do not place a hold-down where the laser can strike it. Also make sure the sheet is not stretched tightly, because heated film may contract and pull against the anchors.
Focus matters more than many users expect
A poorly focused beam spreads energy over a wider area, increasing kerf and heating the edge. Set focus for the actual top surface of the Mylar rather than assuming the bed height is correct. If your machine uses autofocus, verify that the thin transparent film can be detected reliably. A sacrificial backing sheet may help visibility on some machines, but only use backing materials approved for laser cutting.
If your design began as a raster trace, simplify the vector before cutting. Too many tiny nodes can make the laser slow repeatedly around rough paths, depositing extra heat. The vector conversion for laser cutting guide explains how cleaner paths improve cutting behavior.
Why one hot pass can be worse than two light passes
A single slow, powerful pass can dump heat into the same edge long enough to soften nearby material. On thin polyester, a faster light pass may create a narrower kerf. For thicker film, two lighter passes can sometimes be cleaner than one aggressive pass because the material has less time to remain molten around the cut.
That does not mean multiple passes are always better. Repeating the path also reheats the edge. Test both approaches and compare not only whether the part drops out, but also whether bridges stay straight and the sheet remains flat.
Use the smallest practical amount of detail
Fine stencil bridges and tiny holes are where heat problems become obvious first. If a 0.5 mm feature is smaller than the effective kerf, no setting can preserve it reliably. Increase the feature size, thicken the bridge, or simplify the artwork.
For letters and enclosed shapes, structural design matters as much as laser settings. Review the stencil bridges guide before blaming the machine for fragile centers or broken islands.
Clear Mylar may behave differently on diode and CO2 lasers
Transparent materials interact with different laser wavelengths in different ways. Some visible-light diode lasers may pass through clear film instead of depositing enough energy to cut it efficiently, while CO2 systems often interact differently with polyester. If your clear sheet refuses to cut even at settings that should be excessive, verify that your laser type is suitable for that exact material instead of continuing to increase power.
Community reports on clear Mylar frequently show that the machine type matters; the LightBurn community discussion on cutting Mylar is a useful example. Treat community settings as starting clues only, not universal values.
Prevent small cutouts from welding back into place
When tiny pieces remain attached by a glossy edge, the material probably melted rather than vaporizing cleanly. Reduce heat input first. A clean, flat bed and good exhaust also help carry smoke and heat away. Do not manually increase air pressure beyond your machine’s recommended range; excessive airflow can move thin film and create registration errors.
After the test cut, let the sheet cool before flexing it. Pulling at cutouts while the edge is still soft can stretch the surrounding Mylar and permanently deform the stencil.
Watch for heat accumulation in dense designs
A design with many cuts concentrated in one small area can overheat even when each individual path looks acceptable. The laser repeatedly returns to neighboring lines before the film has cooled. Where your software allows it, arrange the cut order so nearby features are not always processed consecutively, or split dense artwork into test sections.
Large solid cutouts can also release loose film that shifts into the beam path. Plan the sequence so important bridges and small details are completed before large pieces become free to move.
If the stencil curls after cutting
Light curl may relax when the sheet cools and is stored flat, but a wavy potato-chip shape usually indicates uneven heat. Do not try to fix a badly laser-warped stencil with more intense heat. Correct the cut parameters first and recut the design if registration accuracy matters.
For minor roll memory or storage curl, use the guide to flattening curled Mylar safely.
A practical troubleshooting order
- Confirm the sheet is known laser-compatible polyester/PET and not PVC or unknown vinyl.
- Check focus and material flatness.
- Run a small test pattern on scrap.
- If edges melt, reduce heat per millimeter.
- If cuts are incomplete, confirm focus before adding power.
- Compare one light pass with multiple lighter passes where appropriate.
- Simplify details that are smaller than the practical kerf.
- Check exhaust and approved hold-down methods.
- Let the film cool before removing tiny cutouts.
Conclusion
Clean Mylar stencil cutting is a balance between enough energy to separate the film and low enough heat to preserve the edge. Start with verified material, keep it flat and in focus, test small changes, and design bridges that match the real cutting process. When melted edges appear, the answer is usually to reduce heat concentration rather than simply adding more power.