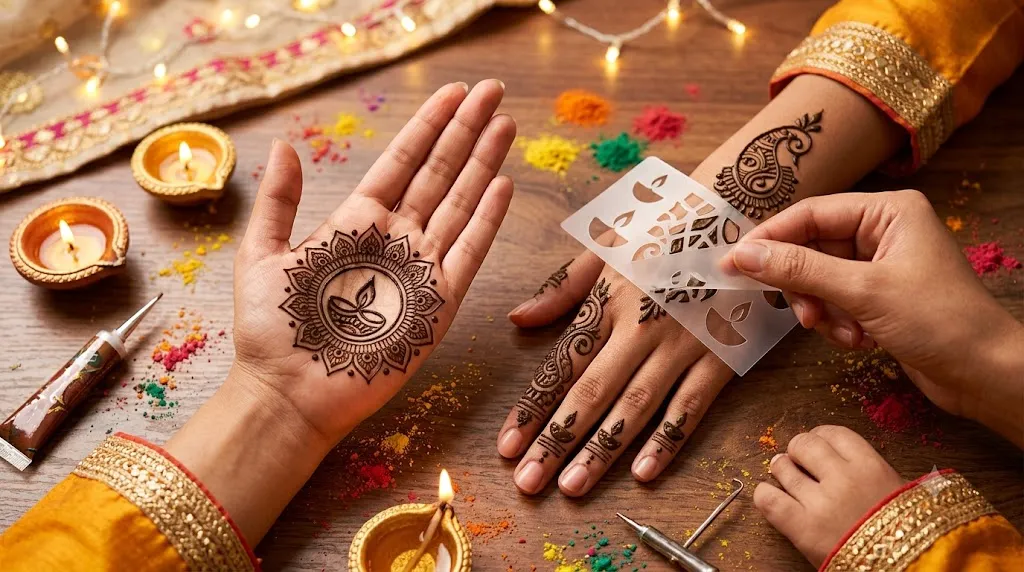
Diwali preparation often includes decorating the home, choosing festive clothes, arranging lights, and applying mehndi. However, drawing a balanced henna design by hand can be difficult, especially when you are short on time or have little experience.
Diwali henna stencil patterns provide a practical solution. The design is already cut into the stencil, so you only need to position it, apply the henna paste, and remove it carefully. This makes festive mehndi easier for beginners, children, families, and anyone who wants a quick but attractive design.
Diwali stencils are available in traditional and modern styles. Popular choices include diyas, lotus flowers, rangoli circles, mandalas, peacocks, paisleys, floral vines, jewelry patterns, and decorative finger bands.
Before choosing an individual Diwali pattern, read the Mehndi & Festive Stencil Designs Complete Guide to understand the main stencil styles, materials, placements, and application methods.
This guide explains how to choose a Diwali stencil, which patterns work best on different parts of the hand, how to apply the stencil correctly, and how to solve common problems such as smudging and uneven lines.
Click Diwali Henna Stencil Patterns visit for see the designs Images
What Are Diwali Henna Stencil Patterns?
Diwali henna stencil patterns are pre-cut templates containing festive mehndi shapes. The open areas of the stencil form the design. When henna paste is spread over those openings, the pattern transfers to the skin.
Unlike freehand mehndi, you do not need to draw every flower, line, dot, or curve yourself. The stencil controls the shape and spacing.
A Diwali stencil may include:
- Diyas and flames
- Rangoli-inspired circles
- Lotus flowers
- Mandalas
- Paisleys
- Peacocks and feathers
- Floral vines
- Leaf trails
- Bracelet patterns
- Finger decorations
- Geometric jaal designs
- Dots, lines, and festive borders
Some stencils contain one small motif, while others cover the palm, back of the hand, wrist, fingers, or a large part of the arm.
Why Use Henna Stencils for Diwali?
Applying freehand mehndi can take time and regular practice. A small mistake may disturb the balance of the full pattern. Stencils reduce this pressure by giving you a prepared outline.
Faster Festive Preparation
Diwali can be busy. You may be decorating the home, preparing food, welcoming guests, or getting children ready. A simple stencil can create a neat pattern much faster than a detailed freehand design.
Easier for Beginners
Beginners often struggle with:
- Uneven circles
- Shaky lines
- Unbalanced flowers
- Incorrect spacing
- Different designs on each hand
- Poor finger placement
A stencil provides a fixed structure. You can focus on applying the paste instead of creating the whole pattern from the beginning.
Better Symmetry
Mandalas, rangoli circles, flowers, and jewelry patterns depend on balance. A properly cut stencil helps keep repeated elements similar in size and position.
Useful for Groups
Stencils are helpful during family mehndi nights, school events, community celebrations, and Diwali parties. The same pattern can be applied to several people while maintaining a consistent look.
Suitable for Customization
A stencil does not have to control the complete design. You can use it for the main motif and add dots, leaves, lines, or finger details by hand.
How to Choose the Right Diwali Henna Stencil
The best design is not always the most detailed one. Choose a pattern that matches your available time, hand size, experience, outfit, and preferred level of coverage.
Choose by Skill Level
Beginners should start with:
- One central mandala
- A simple diya
- A bold lotus
- A short floral vine
- A small wrist band
- Simple finger strips
Avoid dense jaal patterns and very thin full-hand designs during your first attempt. Fine openings are more likely to hold too much paste or lose their shape.
For more beginner options, see Simple Mehndi Stencils for Beginners.
Choose by Application Time
For a 5-minute design:
- Small diya
- Finger bands
- Tiny flower
- One paisley
- Small wrist motif
10-to-15-minute design:
- Palm mandala
- Diagonal floral trail
- Back-hand bracelet pattern
- Lotus with finger details
- Diya and dotted border
detailed festive look:
- Full palm rangoli
- Large peacock pattern
- Connected wrist and finger design
- Multi-part full-hand stencil
- Mandala and paisley combination
Choose by Hand Placement
A stencil designed for the palm may not fit the back of the hand. Palm stencils can be broader and more circular, while back-hand designs often follow the fingers and wrist.
Check the stencil dimensions before using it. A pattern that is too large may fold around the sides of the hand. A pattern that is too small may look lost in the center.
Choose Bold Openings
Medium-sized openings usually give beginners cleaner results. Very thin cuts can fill with paste, move during removal, or disappear after the stencil is lifted.
Look for:
- Clear spacing
- Connected shapes
- Visible borders
- Medium-sized petals
- Simple curves
- Enough space between elements
Best Diwali Henna Stencil Patterns
Diwali patterns often take inspiration from lamps, flowers, rangoli art, festive jewelry, and traditional decorative shapes.
1. Diya Henna Stencil Patterns
A diya is one of the clearest Diwali-themed motifs. It can be placed in the center of the palm, near the wrist, or on the back of the hand.
Popular diya stencil ideas include:
- One diya with a large flame
- Diya surrounded by lotus petals
- Diya with dotted light rays
- Two small diyas facing each other
- Diya inside a circular rangoli
- Diya connected to a floral wrist trail.
A simple diya is a good beginner pattern because it uses bold lines and a clear central shape.
For a balanced result, keep the flame facing toward the fingers when applying the stencil on the palm. On the back of the hand, the flame can point toward the wrist or middle finger depending on the full layout.
2. Rangoli-Inspired Henna Stencils
Rangoli patterns work well as Diwali henna designs because both use repeating floral, circular, and geometric elements.
Common rangoli stencil styles include:
- Circular flower layers
- Repeated teardrop shapes
- Diya-centered rangoli
- Geometric star patterns
- Dot-and-petal circles
- Lotus rangoli
- Peacock-inspired rangoli
Rangoli stencils look attractive in the center of the palm or back of the hand. They can also be used as the main section of a larger design.
When using a circular pattern, mark the center of your palm before placing the stencil. This small step helps prevent a crooked design.
3. Mandala Diwali Henna Stencils
A mandala uses repeated shapes around a center point. It creates a balanced and traditional appearance without covering the entire hand.
Mandala stencils are suitable for:
- Beginners
- Minimal festive looks
- Front-hand designs
- Back-hand designs
- Matching family patterns
- Quick Diwali preparation
A small mandala can be combined with finger bands and wrist dots. A larger mandala may be enough on its own.
Choose a mandala with broad petals if you are new to stencil mehndi. Tiny circles and narrow lines can be harder to fill cleanly.
4. Lotus and Floral Stencil Patterns
Flowers are among the most flexible elements in mehndi. They can appear traditional, soft, modern, or detailed depending on their size and arrangement.
Good floral choices for Diwali include:
- Lotus flowers
- Open-petal flowers
- Floral vines
- Flower bracelets
- Leafy wrist trails
- Rose-inspired circles
- Flowers connected to finger bands
A lotus can be placed below a diya, inside a mandala, or near the wrist. Floral vines work well for diagonal back-hand designs.
Explore more flower combinations in Floral Mehndi Stencil Ideas.
5. Peacock and Feather Patterns
Peacock patterns can create a richer festive look. They are suitable for larger palm designs, side-hand placements, and detailed back-hand layouts.
Possible designs include:
- One peacock feather
- A small peacock with floral details
- Peacock inside a mandala
- Peacock and paisley combination
- Feather trail from wrist to finger
- Two mirrored peacocks
A full peacock may be difficult for a first-time user because the tail can contain many small openings. Start with a simple feather or a bold peacock outline.
6. Paisley Diwali Stencils
Paisleys are curved teardrop-shaped motifs often used in mehndi. They can be repeated, layered, or connected with flowers and leaves.
Popular options include:
- One large palm paisley
- Paisley wrist chain
- Floral paisley
- Paisley and diya design
- Repeated finger paisleys
- Full-hand paisley trail
Paisley patterns are useful when you want a traditional design without using a fully circular mandala.
7. Bracelet and Jewelry-Style Patterns
Jewelry-style mehndi is a good choice when you plan to wear rings, bangles, or a bracelet with your Diwali outfit.
These stencils can include:
- Wrist cuffs
- Ring chains
- Bracelet-to-finger trails
- Beaded lines
- Floral wrist bands
- Hand-chain patterns
- Small finger rings
Leave enough space between the mehndi and your real jewelry. Tight bangles can rub against fresh paste and damage the pattern.
8. Jaal and Geometric Stencils
Jaal designs use connected lines to create a net-like pattern. Small flowers, dots, or leaves may appear where the lines meet.
These designs work best on:
- The back of the hand
- Fingers
- Wrist sections
- Full-hand layouts
- Side-hand placements
Jaal stencils can look impressive, but they require careful placement. Keep the hand relaxed while attaching the stencil. Stretching the skin too much can change the pattern when the hand returns to its normal position.
Best Diwali Stencil Patterns by Placement
Front-Hand Stencil Ideas
The palm is suitable for bold central motifs.
Good front-hand options include:
- Diya in the center
- Circular rangoli
- Lotus mandala
- Large paisley
- Floral circle
- Diya with wrist trail
- Full-palm festive stencil
The palm naturally creates a strong focal area. You do not always need to cover every finger. A central pattern with two or three decorated fingers can look complete.
Back-Hand Stencil Ideas
Back-hand designs often follow the natural line from the wrist to the middle finger.
Suitable options include:
- Diagonal floral vine
- Bracelet pattern
- Jewelry chain
- Small mandala
- Peacock feather
- Jaal pattern
- Lotus trail
Keep fingers slightly apart while applying and drying the design. This helps stop wet paste from touching the next finger.
Finger Stencil Ideas
Finger patterns are useful when you want a minimal design or need something fast.
Try:
- Ring bands
- Small leaves
- Dotted lines
- Mini flowers
- Geometric strips
- Half-filled fingertips
- Tiny paisleys
You can use matching finger patterns with an empty palm or combine them with one central motif.
Diwali Stencils for Children
Choose small, bold, and quick designs for children.
Good options include:
- Tiny diya
- Flower
- Star
- Butterfly
- Mini mandala
- Small leaf trail
- Simple finger dots
Children may find it difficult to keep their hands still for long. Avoid dense full-hand stencils and patterns with very fine details. Adult supervision is important, and the product ingredients should be checked before use.
How to Apply Diwali Henna Stencils Step by Step
Step 1: Gather Your Materials
Prepare everything before attaching the stencil.
You may need:
- A clean henna stencil
- Henna paste
- Tissue or cotton pads
- Mild soap
- A small application tool
- Tape for non-adhesive stencil edges
- A flat surface
- Waste paper or a disposable cloth
Step 2: Clean and Dry the Skin
Wash the application area and dry it completely.
Do not use:
- Lotion
- Hand cream
- Body oil
- Sunscreen
- Perfume on the application area
Oil and moisture can stop an adhesive stencil from lying flat.
Step 3: Test the Position
Place the stencil over the hand before removing its backing.
Check:
- Which direction the pattern faces
- Whether the design fits
- Whether it crosses a deep skin fold
- Whether the center is aligned
- Whether rings or bangles may touch it
Take a photo of the planned position if you need to repeat it on the other hand.
Step 4: Attach the Stencil
For an adhesive stencil, peel away the backing and place the center first. Press outward slowly to remove wrinkles and air pockets.
For a non-adhesive stencil, hold it firmly or secure the outer edges with skin-safe tape.
Do not stretch the stencil too hard. Stretching may change its shape.
Step 5: Apply a Thin, Even Layer of Henna
Spread the paste gently across the openings.
Use enough paste to fill the design, but do not create a thick mound. Excess paste can move underneath the stencil and blur the edges.
Apply in one direction where possible. Rubbing repeatedly over the same area can move the stencil.
Step 6: Check the Edges
Look for lifted corners or sections where the stencil is no longer touching the skin.
Press the outer stencil material down carefully without touching the filled openings.
Step 7: Remove the Stencil Slowly
Lift one corner and peel the stencil back at a low angle.
Do not pull it straight upward. Slow removal reduces the chance of dragging paste across the design.
Avoid touching the newly exposed pattern.
Step 8: Let the Henna Dry
Keep the hand still and avoid water while the paste sets.
Separate the fingers and keep the design away from:
- Clothing
- Jewelry
- Hair
- Furniture
- Mobile phones
- Other wet mehndi areas
Follow the instructions supplied with the henna product because formulas and recommended times can differ.
Common Diwali Henna Stencil Mistakes and Solutions
The Henna Spreads Under the Stencil
Possible causes:
- Too much paste
- Loose stencil edges
- Oily skin
- Paste that is too runny.
Solution: Clean the skin, press the stencil flat, and apply a thinner layer.
The Pattern Smudges During Removal
This usually happens when the stencil is pulled too quickly or dragged across wet paste.
Solution: Start from one corner and peel slowly at a low angle.
Fine Details Are Missing
Very narrow openings may not fill properly, or they may close when the paste spreads.
Solution: Choose a design with wider lines. Apply controlled pressure and check that each opening has received paste.
The Stencil Will Not Stick
Oil, sweat, lotion, or repeated repositioning can weaken the adhesive.
Solution: Wash and dry the hand again. Use a fresh stencil when the adhesive has become weak.
The Pattern Looks Crooked
A circular motif can look uneven when its center is not aligned with the hand.
Solution: Mark the middle point before attaching the stencil. Check the direction from both the wrist and fingertips.
Finger Designs Keep Smudging
Wet paste can touch the neighboring fingers.
Solution: Keep the fingers separated. Apply finger patterns one at a time when necessary.
Both Hands Look Different
The same stencil may face the wrong direction when moved to the second hand.
Solution: Use mirrored left-hand and right-hand stencils or rotate and test the pattern before applying paste.
Adhesive vs Reusable Diwali Henna Stencils
Adhesive stencils stick directly to the skin.
Advantages:
- Easier for beginners
- Less movement during application
- Better contact around flat areas
- Quick positioning
Limitations:
- Some are designed for one use.
- Adhesive may weaken after repositioning.
- May wrinkle around curved areas
- Can pull on very sensitive skin
Reusable Non-Adhesive Stencils
Reusable stencils are normally made from flexible plastic or another washable material.
Advantages:
- Can be used for repeated patterns
- Helpful for family events
- Suitable for practice
- Less waste when cleaned correctly
Limitations:
- Must be held or taped in place
- More likely to move
- Need proper cleaning and drying.
- May not fit closely around fingers
Choose an adhesive stencil for your first attempt. Choose a reusable stencil when you need the same design several times and are comfortable holding it steady.
How to Clean and Store Reusable Stencils
First, confirm that the manufacturer describes the stencil as reusable. Do not wash a single-use paper or adhesive stencil unless its instructions allow it.
For reusable plastic stencils:
- Remove extra paste before it dries completely.
- Clean the stencil according to the material instructions.
- Avoid bending delicate cut sections.
- Let it dry on a flat surface.
- Store it between clean protective sheets.
- Keep it away from heat and direct sunlight.
- Do not reuse a damaged stencil with rough or broken edges.
Clean skin-contact tools between users. Do not share unclean stencils or applicators.
How to Create a Darker and Cleaner Henna Result
The final color depends on several factors, including the product, ingredients, skin area, application, drying conditions, and individual skin.
For a cleaner result:
- Use a product with a clear ingredient label.
- Follow its instructions.
- Keep the design free from water while it develops.
- Avoid scraping or rubbing the wet design.
- Keep the hand still during early drying.
- Do not place tight jewelry over fresh paste.
- Protect the design from clothing and accidental contact.
Do not use random chemicals or unlabelled mixtures simply because they promise an instant black result.
Henna Safety Before Diwali
Check the full ingredient list before placing any henna product on the skin. Products sold as “black henna” may contain added dyes such as para-phenylenediamine, commonly called PPD. The FDA has received reports of harmful skin reactions linked to products marketed as henna and black henna. DermNet also explains that PPD may cause allergic contact dermatitis in black-henna temporary tattoos.
Follow these basic precautions:
- Avoid products with missing ingredient labels.
- Do not assume “natural” wording proves that a product is safe.
- Follow all manufacturer warnings.
- Do not apply henna over broken, irritated, or infected skin.
- Stop using the product if burning, swelling, blistering, or severe itching develops.
- Seek medical advice for a serious or worsening reaction.
- Use extra care with children and people who have sensitive skin or a history of reactions.
A stencil improves the shape of the pattern, but it does not make an unknown henna product safer.
Real-World Uses for Diwali Henna Stencils
Diwali stencils can be useful in several settings.
Family Mehndi Night
Family members can select matching or related patterns. For example, one person may choose a large diya while others use smaller diya-and-flower designs.
Last-Minute Festive Preparation
A small mandala or wrist pattern works when there is not enough time for a full-hand design.
School and Community Events
Simple templates can support supervised cultural art activities. Printable hand sheets can be used for practice when applying products to skin is not suitable.
Diwali Parties
A small mehndi station can offer a few quick designs such as flowers, diyas, and finger bands.
Content and Photography
Creators can use several stencil styles to produce step-by-step photos, placement comparisons, and beginner tutorials.
Small Mehndi Businesses
Reusable pattern sets can help artists offer faster designs, but stencils should remain clean and hygienic between clients.
People Also Ask
Are Diwali henna stencils good for beginners?
Yes. Beginners should choose bold patterns with medium-sized openings, such as a simple diya, lotus, mandala, floral vine, or wrist band.
What is the easiest Diwali mehndi stencil pattern?
A single diya, small flower, central mandala, or simple finger band is usually easier than a dense full-hand design.
Can I combine a stencil with freehand mehndi?
Yes. Use the stencil for the main design and add dots, leaves, lines, or finger details by hand after removing it.
Which stencil is best for the front hand?
Circular rangoli, mandala, diya, lotus, and large paisley designs work well in the center of the palm.
Which stencil is best for the back hand?
Diagonal floral trails, bracelet patterns, jewelry designs, small mandalas, and jaal patterns suit the back of the hand.
Can children use Diwali henna stencils?
Children can use small designs under adult supervision, but Someone must check the product ingredients. Avoid unknown mixtures and products marketed as instant black henna.
Why does henna bleed under a stencil?
The usual causes are excess paste, loose stencil edges, oily skin, or paste that is too thin.
Can I reuse a henna stencil?
Only reuse a stencil when its material and instructions allow it. Clean, dry, and store reusable stencils properly.
Should I remove the stencil while the henna is wet?
The correct timing depends on the stencil and henna product. In general, the paste should hold its shape, and the stencil should be peeled slowly without dragging it across the design.
How long does stencil mehndi last?
The result varies according to the product, skin, body area, and aftercare. It gradually fades as the outer skin naturally renews.
Can one stencil be used on both hands?
Yes, but the direction may change. Test the placement first or use a mirrored stencil set for a more balanced result.
What is the difference between a rangoli and mandala stencil?
Both may use circular repetition. Rangoli-inspired stencils often include festive flowers, diyas, dots, and geometric borders, while mandalas usually develop outward from one balanced center.
Conclusion
Diwali henna stencil patterns make festive mehndi easier for beginners, busy families, children, and anyone who wants a neat design without drawing every element by hand.
Start with a pattern that matches your skill level and available time. Diyas, lotuses, mandalas, rangoli circles, floral vines, paisleys, and bracelet patterns all work well for Diwali. The cleanest results usually come from proper skin preparation, careful stencil placement, a thin layer of paste, and slow stencil removal.