Add a custom grid to any photo for drawing, scaling, canvas transfer, or printing. Adjust the grid and download your result instantly.
Advanced Grid Options
Image & Crop
Scale Drawing to Paper, Canvas or Wall
Reference
Target surface
Download & Print
How to Use the Image Grid Maker
Upload your reference photo using the upload button, drag and drop an image, or paste an image directly into the tool.
Choose the number of rows and columns you need. A smaller grid works well for simple subjects, while a larger grid gives you additional reference points for detailed artwork.
Adjust the grid color, line thickness, opacity, labels, and guide settings until important details in your reference remain clearly visible.
If you are transferring the picture to paper, canvas, or a wall, enter the target dimensions so you can keep the proportions consistent.
When the grid is ready, export your gridded image, matching blank grid, transparent grid, PDF, or printable reference.
Why Use a Grid for Drawing?
A drawing grid divides a complicated image into smaller sections. Instead of judging the position of an eye, building, tree, hand, or other object against the entire photograph, you can compare it with the boundaries of one smaller cell.
This makes it easier to study shapes, angles, spacing, landmarks, and proportions.
The technique is not limited to modern digital drawing tools. The Metropolitan Museum of Art documents historical artwork where a squared grid was used to transfer a complex composition to another work. See the Metropolitan Museum of Art example
The National Gallery of Art also holds historical drawings described as being squared for transfer, demonstrating the long-standing use of grids when moving compositions between surfaces. View an example from the National Gallery of Art
Add a Grid to an Image for Drawing
Upload your photo and select the same number of rows and columns you plan to use on your drawing surface.
For example, you could place a 10 × 10 grid over a portrait and create another 10 × 10 grid on your drawing paper.
You then reproduce the important shapes from each reference cell inside the corresponding drawing cell.
Coordinate labels can make this process easier. Labels such as A1, A2, B1, and B2 help you identify exactly which part of the reference you are working on.
This can be especially useful for portraits, landscapes, architecture, animals, vehicles, and other detailed subjects.
Choose the Right Grid Size for Drawing
There is no single grid size that works for every image.
For a simple subject, start with a relatively small grid such as:
- 4 × 4
- 5 × 5
- 6 × 6
For images containing more detail, you may prefer:
- 8 × 8
- 10 × 10
- 12 × 12
- 16 × 16
Larger numbers of cells provide more reference points, but that does not automatically make a drawing easier.
If the cells become too small, the grid itself can begin to hide details in the image.
Start with the simplest grid that gives you enough reference points. Increase the number of rows and columns only when you need additional accuracy.
Use Square Grid Cells
Square cells are particularly useful when you want an easy-to-measure reference.
If every cell on the reference is square, create proportional square cells on your drawing surface as well.
For example, a one-inch reference square could correspond to a two-inch square on a larger canvas.
This creates a simple enlargement ratio while maintaining the basic spatial relationship between different parts of the artwork.
Scale a Drawing to Paper, Canvas, or Wall
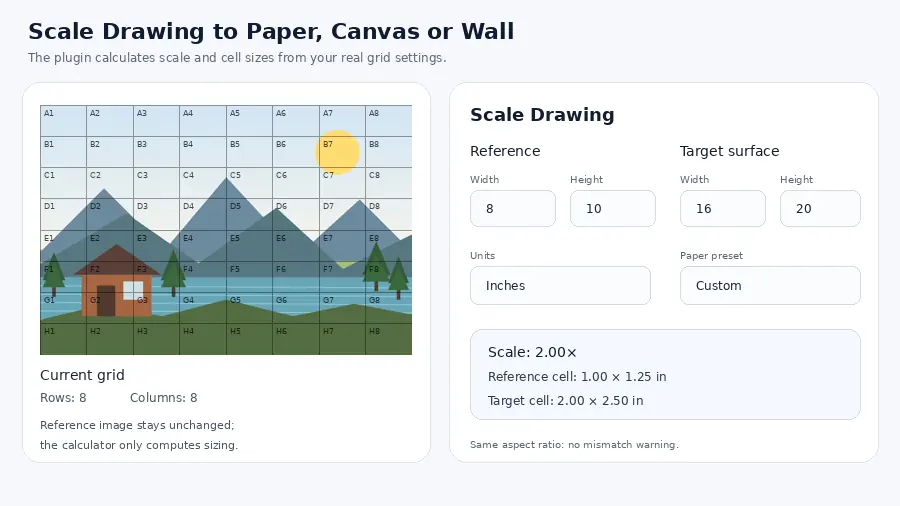
One of the most useful applications of an image grid is enlarging artwork. For cutting and material choices, see our guide to stencil making tools and techniques.
Suppose your reference drawing measures 8 × 10 inches and your final canvas measures 16 × 20 inches.
The target dimensions are twice the reference dimensions, so the drawing is being enlarged at a 2× scale.
A one-inch grid cell on the reference would therefore correspond to a two-inch cell on the canvas.
Our Image Grid Maker includes drawing-surface measurements so you can compare reference and target dimensions before beginning your artwork.
You can work in:
- Inches
- Centimeters
- Millimeters
If you also work with stencil artwork, our Free Stencil Maker can help turn an image into a stencil after you prepare the reference.
For larger stencil projects, see our guide on scaling a stencil without losing quality.
Keep the Same Aspect Ratio
Scaling is easiest when the reference image and target surface use the same aspect ratio.
For example:
8 × 10 becomes 16 × 20.
Both dimensions have been doubled, so the proportions remain unchanged.
Problems occur when you try to fit an image into a surface with substantially different proportions.
For example, forcing an 8 × 10 reference into a 16 × 16 square can require cropping or distortion.
Check the dimensions before drawing your grid.
The tool can warn you when the target surface does not closely match the proportions of your source image.
Use a Drawing Grid for Portraits
Portraits are one of the most common uses for a drawing grid.
Small placement errors in the eyes, nose, mouth, jaw, ears, or hairline can noticeably change a face.
A grid gives you smaller areas to compare.
Instead of asking, “Where should the eye go on this entire page?” you can examine its position relative to the boundaries and intersections of a few nearby cells.
Coordinate labels are particularly useful for complicated portraits.
You can also adjust brightness, contrast, or grayscale to make shadows, highlights, edges, and facial landmarks easier to study.
Use Grayscale for Value Drawing
Color can sometimes distract from light and dark relationships.
Switching the reference to grayscale can make it easier to study:
- Highlights
- Midtones
- Shadows
- Edges
- Large value shapes
This is especially useful for charcoal, graphite, pencil, ink, and monochrome studies.
You can adjust contrast when the reference looks too flat or important edges are difficult to identify.
Adjust Grid Line Color and Opacity
A black grid is not ideal for every photograph.
Dark grid lines may disappear over shadows, while white lines may become difficult to see over bright backgrounds.
Choose a grid color that remains visible across most of your reference.
You can also reduce opacity so the lines provide guidance without hiding important details.
Modern image-editing software uses grids for similar alignment and proportion tasks. Adobe describes grids as evenly spaced reference structures that help maintain alignment and consistent proportions. Learn about grids and guides from Adobe
Add Coordinate Labels
Labels make large grids much easier to navigate.
For example, columns can use letters while rows use numbers:
A1
A2
B1
B2
If you stop drawing and return later, coordinates make it easier to find your previous position.
They are also useful in classrooms because a teacher can refer students to a particular grid cell instead of pointing to a vague area of the image.
Use Diagonal Guides
Horizontal and vertical lines are not the only useful references.
Diagonal guides can help when a cell contains:
- Sloping shoulders
- Roof lines
- Facial angles
- Curved objects
- Perspective lines
- Limbs
- Clothing folds
A diagonal divides a square into smaller reference areas, giving you another point for estimating position.
Use these guides only when they help. Too many lines can make a reference unnecessarily complicated.
Use Center Guides
Center guides mark the horizontal and vertical center of the image.
They can help you quickly identify:
- Main subject placement
- Symmetry
- Central facial features
- Horizon position
- Overall composition
For symmetrical subjects, center guides can be particularly useful before you begin working with smaller cells.
Create a Matching Blank Drawing Grid
Sometimes you need more than a gridded reference.
The Image Grid Maker can also create a matching blank grid using the same rows and columns.
A blank grid is useful for:
- Drawing practice
- Printable worksheets
- Classroom activities
- Canvas preparation
- Proportion exercises
- Reference transfer
Print the blank grid and work directly on it, or use it as a guide when drawing your grid manually.
Download a Transparent Grid Overlay
You can also export the grid without the background photograph.
A transparent grid overlay can be useful when you want to place the same grid over another version of an image.
It can also be imported into compatible illustration, image-editing, presentation, or design software.
Before exporting, choose your preferred:
- Rows
- Columns
- Grid color
- Line thickness
- Opacity
- Labels
- Major lines
- Diagonal guides
This gives you a reusable grid rather than a grid permanently combined with one photograph.
Transfer a Reference to Canvas
A grid can help when transferring a small digital reference to a larger canvas.
First choose the number of cells on the reference.
Next mark the same number of rows and columns on the canvas.
The physical cells on the canvas can be larger, provided their proportions correspond with the reference grid.
Work through the artwork section by section.
Rather than completing each square as an isolated mini-drawing, regularly compare neighboring cells so lines and shapes continue naturally across grid boundaries.
Scale Reference Art for Murals
The grid method becomes particularly useful when the final artwork is much larger than the original reference.
A mural can be divided into manageable sections, letting you transfer the design one area at a time.
Measure the wall first.
Then determine the number and physical size of your grid cells.
Use major grid lines or coordinate labels to help locate sections when working on a large surface.
For very large projects, double-check all measurements before drawing permanent lines on the wall.
Practice Proportion With a Drawing Grid
A drawing grid can help students practice observation rather than simply guessing proportions.
Instead of trying to reproduce an entire subject immediately, students can study how individual shapes interact with cell boundaries.
Teachers can use gridded references and blank matching grids for:
- Portrait exercises
- Proportion studies
- Upscaling exercises
- Value studies
- Classroom worksheets
- Collaborative murals
Coordinate labels can also allow a larger image to be divided among several students.
Use a Grid for Landscape Drawing
Landscape references often contain multiple layers, including a horizon, foreground objects, buildings, roads, mountains, trees, and sky.
A grid provides fixed reference points for positioning these elements.
Start by locating large structural features such as the horizon.
Then use intersections and cell boundaries to estimate the position of smaller elements.
Do not try to copy every tiny object immediately. Establish the largest shapes and proportions first.
Use Drawing Grids for Architectural Studies
Architectural references often contain repeated shapes, strong edges, symmetry, and perspective.
A grid can help you compare:
- Window placement
- Roof angles
- Wall proportions
- Door positions
- Repeated structures
- Perspective relationships
Remember that a rectangular grid does not automatically correct perspective. It simply gives you additional reference points from which to observe it.
Print Your Drawing Grid
When you are ready to work away from the screen, create a printable drawing reference.
The tool supports common paper and measurement workflows including:
- US Letter
- Legal
- A4
- A3
- Custom dimensions
US-based artists can work in inches and use common US paper sizes.
International users can choose centimeters or millimeters along with A-series paper formats.
Check the preview before printing so important parts of the reference are not cropped.
For artwork that needs fine detail, use a high-resolution export instead of taking a screenshot from the browser.
Download Your Grid in Different Formats
Different projects may require different outputs.
The Image Grid Maker provides options for exporting your work for digital use, printing, or further editing.
Available workflows can include:
PNG for high-quality raster references.
JPG when a smaller standard image file is preferred.
SVG for scalable grid-based output.
PDF for printing and sharing.
Print when you want to send the finished reference directly to your printer.
You can also download the gridded image, blank grid, or transparent grid depending on your project.
Your Images Stay Private
Your reference image is processed directly in your browser for the grid-making workflow.
There is no need to create an account just to add a grid to an image.
This also keeps the process fast because you can make adjustments and preview changes directly on your device.
Image Grid Maker Features
The tool combines the main controls artists need in one workspace:
- Custom rows and columns
- Square grid cells
- Grid presets
- Custom grid colors
- Adjustable line thickness
- Grid opacity
- Solid, dashed, and dotted lines
- Coordinate labels
- Major grid lines
- Subdivisions
- Diagonal guides
- Center guides
- Image rotation
- Horizontal and vertical flip
- Brightness controls
- Contrast controls
- Grayscale reference mode
- Drawing-surface calculator
- Inches, centimeters, and millimeters
- Common paper-size presets
- Matching blank grid
- Transparent grid
- PNG export
- JPG export
- SVG export
- PDF export
- Print support
- Mobile-friendly controls
Frequently Asked Questions
What is an Image Grid Maker?
An Image Grid Maker places evenly spaced rows and columns over a reference image. Artists can use the resulting cells to study proportions, transfer a drawing, or enlarge artwork onto another surface.
How do I add a grid to a photo?
Upload your photo to the tool, choose your rows and columns, customize the grid appearance, and preview the result. You can then download or print the gridded image.
Is the Image Grid Maker free?
Yes. The tool is designed to let you create drawing grids online without requiring an account.
What grid size should I use for drawing?
Start with a simple grid such as 4 × 4 or 5 × 5 for basic subjects. Detailed portraits and complex references may benefit from 8 × 8, 10 × 10, or more cells.
Can I use a grid to enlarge a drawing?
Yes. Keep the same number of cells on both the reference and target surface while increasing the physical dimensions of the target cells.
Can I use different measurements?
Yes. You can work with inches, centimeters, or millimeters depending on the drawing surface and project.
Can I create square grid cells?
Yes. Square cells are useful when you want consistent width and height measurements for proportional transfer.
Can I add coordinates to my drawing grid?
Yes. Coordinate labels such as A1 or B4 make it easier to find corresponding areas in detailed drawings.
Can I make a blank grid without a photo?
Yes. A matching blank grid can be used for drawing practice, worksheets, canvas preparation, or printing.
Can I download only the transparent grid?
Yes. A transparent grid is useful when you want to place the grid over another image or continue working in compatible design software.
Can I print my drawing grid?
Yes. Prepare the grid using an appropriate paper size or custom dimensions, then use the print or PDF option.
Can I use the Image Grid Maker on my phone?
Yes. The interface is designed to work on mobile phones, tablets, laptops, and desktop computers.
Do I need to upload my image to an account?
No account is required for the browser-based grid workflow.
Is this an Instagram grid maker?
No. This Image Grid Maker is designed primarily for drawing references, canvas transfers, scaling, art exercises, murals, and printing rather than splitting social-media posts into tiles.
Create Your Drawing Grid
Upload your reference image, choose your grid settings, set your drawing dimensions, and create a printable drawing reference.
Use the Image Grid Maker above to start your drawing grid.
If you want to turn your prepared artwork into a stencil afterward, continue with the Free Stencil Maker.