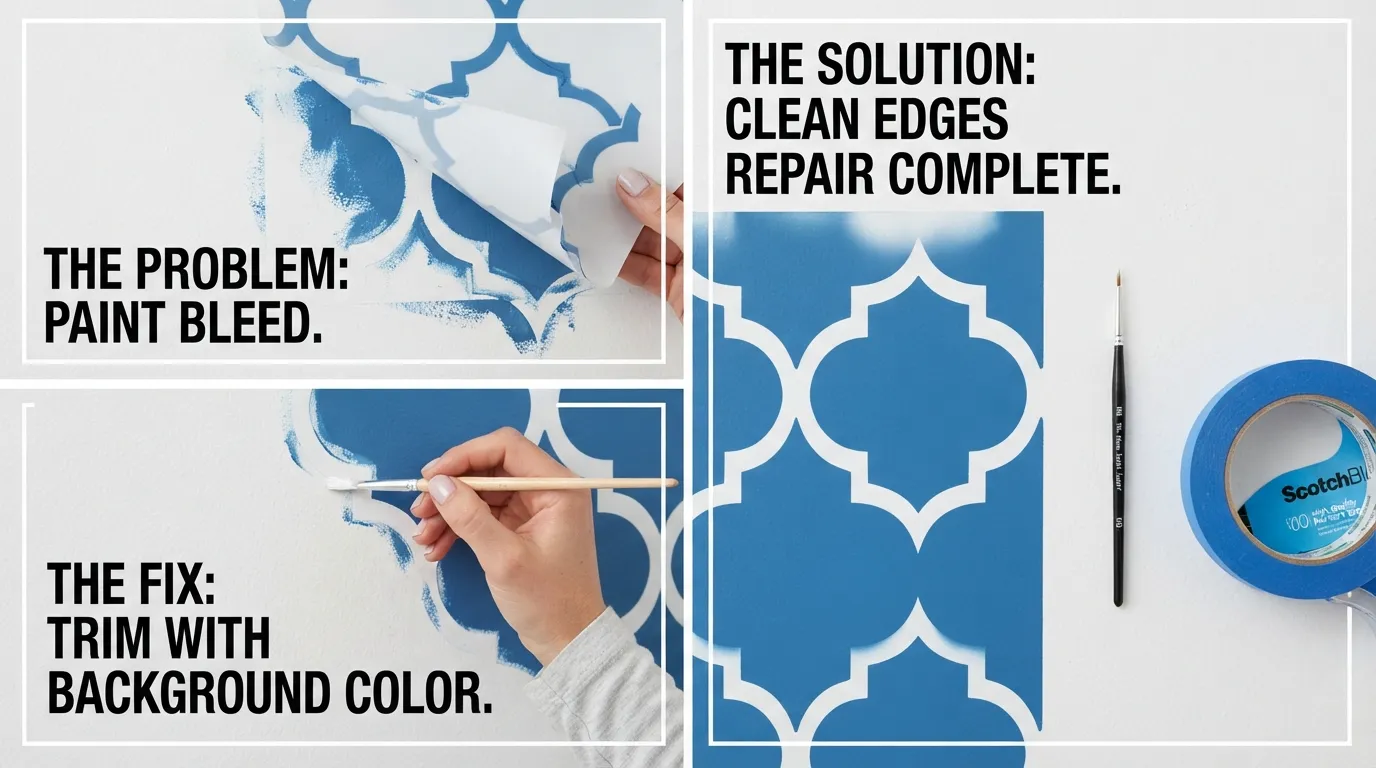
Paint bleeding under a stencil is one of the most common stencil problems, especially for beginners using acrylic paint, wall paint, chalk paint, spray paint, stencil brushes, foam rollers, or Cricut stencil vinyl. The good news is simple: most stencil bleeding can be fixed, and almost all future bleeding can be prevented with better surface prep, less paint, and proper edge sealing.
This guide is part of our Stencil Making Tools & Techniques Complete Guide, where we explain stencil materials, cutting tools, Cricut settings, reusable stencil care, and clean painting methods for DIY makers.
If your stencil design looks fuzzy, smudged, or uneven, do not panic. The repair method depends on whether the paint is still wet, already dry, or soaked into a rough surface like wood, canvas, fabric, or textured wall.
What Is Paint Bleeding Under a Stencil?
Paint bleeding happens when paint slips under the cut edges of the stencil instead of staying only inside the open design areas. This creates blurry lines, rough edges, tiny smudges, or shadow-like marks around the stencil pattern.
A stencil works by allowing pigment to pass only through the cut-out parts of the design. Traditional stencil materials may include paper, plastic, vinyl, wood, or metal sheets, depending on the project type. In modern DIY projects, most people use reusable mylar stencils, adhesive stencil vinyl, Cricut stencil film, or flexible plastic stencil sheets.
Bleeding usually happens because there is a gap between the stencil and the surface. Paint then moves into that gap. The gap may be caused by too much paint, a loose stencil, textured material, poor adhesive contact, or using a brush stroke that pushes paint sideways.
Quick Answer: How Do You Fix Paint Bleeding Under Stencil?
To fix paint bleeding under a stencil, first check whether the paint is wet or dry. If the paint is still wet, gently lift the stencil, wipe the bleeding area with a damp cotton swab or baby wipe, and clean the edge before the paint sets. If the paint is dry, use the base color and a small detail brush to repaint the messy edges. For wood, lightly sand the bleed, repaint the background, let it dry fully, and stencil again using less paint.
For future projects, use a nearly dry brush or roller, press the stencil firmly, apply paint in light layers, and seal the stencil edge with the base color, Mod Podge, clear coat, or spray adhesive when needed.
Why Does Paint Bleed Under Stencils?
Paint bleeding is usually not caused by the stencil alone. It is normally a combination of paint amount, stencil pressure, surface texture, and application technique.
The most common causes are:
- Too much paint on the brush, sponge, or roller
- Thin or watery paint
- Stencil not pressed flat against the surface
- Rough wood grain, canvas weave, or textured wall
- Side-to-side brush strokes
- Heavy roller pressure
- Weak adhesive on stencil vinyl
- Removing the stencil too late or too aggressively
- Dust, oil, or moisture on the surface
- Reusing a dirty stencil with dried paint buildup
Most beginner stencil mistakes come from using too much paint. A stencil brush or foam roller should look almost dry before touching the stencil. It may feel slow, but multiple light coats create cleaner lines than one heavy coat.
Wet Paint Bleeding: How to Fix It Immediately
If you notice bleeding while the paint is still wet, act quickly. Wet paint is easier to correct than dried paint.
Step 1: Stop Painting Immediately
Do not add more paint. More paint will only push the wet paint farther under the stencil.
Pause and check the damage. If the bleeding is only in one small area, you may not need to remove the whole stencil.
Step 2: Lift the Stencil Carefully
Lift the stencil slowly from one corner. If you are using adhesive vinyl, peel at a low angle. If you are using a reusable stencil, lift straight upward to avoid dragging wet paint across the surface.
Do not slide the stencil sideways. Sliding creates smears.
Step 3: Wipe the Bleed
Use one of these tools:
- Damp cotton swab
- Baby wipe
- Small damp cloth
- Fine detail brush dipped in clean water
- Toothpick wrapped with tissue
Gently clean only the blurred area. Avoid rubbing too hard, especially on paper, unsealed wood, canvas, or painted walls.
Step 4: Dry the Surface
Let the corrected area dry fully before continuing. If the surface is still damp, the next paint layer may bleed again.
Step 5: Reposition and Continue
When the area is dry, place the stencil back carefully. Press the edges down firmly and continue with less paint.
A useful rule: the brush or roller should feel dry, not wet. If it looks loaded, offload more paint onto a paper towel first.
Dry Paint Bleeding: How to Repair It
Dried stencil bleeding needs a different approach. You cannot wipe it away, so the best method is to repaint the messy edge with the background color.
Step 1: Match the Base Color
Use the same paint color as your background. If you painted the base yourself, use leftover paint from the original project.
If you do not have the exact base color, test a close match on a hidden area first.
Step 2: Use a Small Detail Brush
Choose a small brush with a fine tip. A round detail brush, liner brush, or angled craft brush works well.
Avoid large brushes because they can cover too much of the stencil design.
Step 3: Paint Over the Bleed
Carefully repaint the fuzzy edges with the background color. Use short strokes. Do not overload the brush.
For very small mistakes, use a toothpick or micro brush.
Step 4: Let It Dry Fully
Wait until the touch-up paint dries before judging the final result. Wet paint often looks more visible than dry paint.
Step 5: Restencil If Needed
If the design edge became too thin after touch-up, reposition the stencil and repaint the design with a very small amount of paint.
For reusable stencil projects, you may also want to read our guide on how to clean reusable stencils without damaging the design because dried paint buildup can cause future bleeding.
How to Fix Stencil Bleeding on Wood
Wood is one of the most common surfaces for stencil bleeding because it has grain lines, tiny pores, and uneven texture. Paint can travel through these small grooves.
Best Fix for Wet Bleeding on Wood
If the paint is wet:
- Lift the stencil carefully.
- Wipe the bleed with a damp cotton swab.
- Let the wood dry.
- Lightly sand if needed.
- Reapply the stencil and paint again with less paint.
Best Fix for Dry Bleeding on Wood
If the paint is dry:
- Lightly sand the blurred area with fine-grit sandpaper.
- Wipe away dust with a dry cloth.
- Repaint the base color.
- Let it dry completely.
- Seal the stencil edge before repainting.
Best Prevention Method for Wood
The cleanest method is to seal the stencil edge before applying the top paint.
Use one of these:
- Base coat paint
- Clear matte sealer
- Mod Podge
- Light clear acrylic spray
- Wood-safe stencil adhesive
The idea is simple: if anything leaks under the stencil edge, it should be clear or the same color as the background. After that dries, your top color stays sharper.
How to Fix Stencil Bleeding on Walls
Wall stenciling often bleeds because of wall texture, roller pressure, or too much paint.
For Small Bleeds
Use the wall base color and a small artist brush to clean the edges. This is the easiest repair for painted walls.
For Large Bleeds
If the bleeding is very visible:
- Let the stencil paint dry.
- Paint over the damaged area with the wall color.
- Let it dry completely.
- Reposition the stencil using registration marks.
- Repaint with a dry roller technique.
Wall Stencil Tip
Use a dense foam roller or low-nap roller. High-nap rollers hold too much paint and can push paint under the stencil edges.
Do not press hard. Light pressure gives better results.
How to Fix Bleeding With Cricut Stencil Vinyl
Cricut stencil vinyl can give very sharp results, but bleeding still happens when the vinyl is not burnished well or the surface is textured.
Common Cricut Stencil Bleeding Causes
- Transfer tape pulled the stencil loose
- Vinyl edge was not pressed down firmly
- Wood or canvas surface was too rough
- Paint was too watery
- Too much paint was applied at once
- Stencil was removed before the paint settled properly
Repair Method
For dry paint bleeding:
- Remove the stencil vinyl slowly.
- Let the paint dry fully.
- Touch up the edges with the background color.
- Use a fine brush for small details.
- For wood, sand lightly before repainting.
Prevention Method
Before painting, burnish the stencil vinyl firmly from the center outward. Pay special attention to small letters, corners, thin lines, and decorative cuts.
For rough surfaces, apply a thin sealing layer before the top color. This creates a tighter edge and reduces paint movement.
For better material selection, read our related guide on best stencil material for Cricut projects.
Best Paint Type to Avoid Stencil Bleeding
The best paint for stenciling is usually thicker paint that does not run easily.
Good options include:
- Acrylic craft paint
- Chalk paint
- Stencil creme
- Thick wall paint
- Fabric paint for fabric projects
- Spray paint used in light coats
Avoid very watery paint unless the stencil is strongly sealed and the surface is smooth. Thin paint flows quickly and can move under stencil edges.
Best Applicator to Stop Stencil Bleeding
Different applicators work for different stencil projects.
| Applicator | Best For | Bleed Risk | Best Technique |
|---|---|---|---|
| Stencil brush | Wood, walls, detailed designs | Low | Circular or dabbing motion |
| Dense foam roller | Walls, floors, large stencils | Medium | Light pressure, dry roller |
| Sponge | Small craft projects | Medium | Dab up and down |
| Spray paint | Outdoor signs, metal, plastic | Medium to high | Short light bursts |
| Regular paintbrush | Small touch-ups only | High | Avoid side-to-side strokes |
A stencil brush is usually best for beginners because it gives better control. A foam roller is faster for large designs, but it must be offloaded properly.
Step-by-Step Method to Prevent Paint Bleeding Next Time
Step 1: Clean the Surface
Dust, oil, and moisture can prevent the stencil from sitting flat. Wipe the surface and let it dry fully.
For wood, sand the surface smooth before painting.walls, remove dust and loose paint. For glass or plastic, clean with rubbing alcohol if the paint type allows it.
Step 2: Secure the Stencil
Use painter’s tape, stencil adhesive, or adhesive stencil vinyl. The stencil should not move when touched.
For large stencils, tape the top first, then smooth downward.
Step 3: Offload the Paint
Load your brush or roller, then remove most of the paint on a paper towel.
The tool should look almost dry.
This is the most important step.
Step 4: Apply Light Layers
Use several thin coats instead of one thick coat.
For brushes, use a dabbing, stippling, or circular motion. For rollers, use light pressure. spray paint, use short bursts from the correct distance.
Step 5: Remove the Stencil Carefully
Remove the stencil slowly. Pull at a low angle for vinyl and lift gently for reusable plastic stencils.
Do not drag the stencil across wet paint.
Problem-Solution Table
| Problem | Likely Cause | Best Fix |
|---|---|---|
| Fuzzy stencil edges | Too much paint | Touch up with base color and use less paint next time |
| Paint smears after lifting stencil | Stencil moved sideways | Let dry, repaint base, reposition stencil |
| Bleeding on wood grain | Wood not sealed | Sand, repaint, seal edges, stencil again |
| Bleeding on wall texture | Surface uneven | Use adhesive spray and dry roller technique |
| Paint pools around design | Roller overloaded | Offload roller and use lighter coats |
| Small letters look messy | Vinyl not burnished | Press edges firmly before painting |
| Reusable stencil bleeds repeatedly | Dried paint buildup | Clean stencil and check edge condition |
Common Mistakes That Cause Paint Bleeding
Mistake 1: Using Too Much Paint
This is the biggest stencil mistake. If the brush is wet, it will bleed. the roller is shiny with paint, it will bleed. If paint pools around stencil edges, it will bleed.
Use less paint than you think you need.
Mistake 2: Brushing Sideways
Side-to-side strokes push paint under the stencil. Instead, dab straight up and down or use a soft circular stencil motion.
Mistake 3: Painting on Rough Surfaces Without Sealing
Rough wood, canvas, brick, and textured walls all need extra care. Seal the surface or use adhesive to reduce gaps.
Mistake 4: Removing the Stencil Too Fast
Fast removal can smear wet paint. Peel slowly and keep the stencil away from freshly painted areas.
Mistake 5: Reusing a Dirty Stencil
Dried paint around stencil openings creates uneven edges. Clean reusable stencils before paint buildup becomes thick.
People Also Ask
Can I fix stencil bleeding after it dries?
Yes. The easiest way is to repaint the messy edges with the background color using a small detail brush. For wood, you can lightly sand the bleed before repainting.
Should I remove the stencil while paint is wet or dry?
For many craft paints, removing the stencil while the paint is still slightly wet helps prevent peeling and rough edges. However, follow the paint and stencil material instructions when using specialty vinyl, stain, or sealers.
Does Mod Podge stop stencil bleeding?
Yes, Mod Podge can help seal stencil edges, especially on wood signs. Apply a thin coat over the stencil edge, let it dry, then apply your stencil paint.
Why does my Cricut stencil keep bleeding?
The most common reasons are weak burnishing, rough surface texture, too much paint, watery paint, or removing transfer tape in a way that lifts the stencil edge.
What is the best brush for stenciling without bleeding?
A stencil brush with firm, flat bristles is best for controlled application. For large areas, a dense foam roller can work if it is almost dry.
Real-World Use Cases
DIY Wood Signs
For farmhouse signs, wedding boards, nursery signs, and home decor plaques, always sand the wood first. Then apply a base coat, let it dry, place the stencil, seal the edge, and apply the top color in light layers.
Wall Patterns
For accent walls, use a level, painter’s tape, and a dry roller. Keep your roller light. Too much pressure can push paint under the stencil.
Fabric Stencils
For fabric bags, shirts, and cushion covers, place cardboard under the fabric and use fabric paint sparingly. Dab instead of brushing.
Festive Craft Stencils
For gift boxes, trays, cards, and seasonal decor, use a small stencil brush and thin layers. Metallic paints often look better in multiple light coats.
Final Tips for Clean Stencil Edges
Paint bleeding under a stencil is frustrating, but it is usually fixable. Start by checking whether the paint is wet or dry. Wet bleeding can often be wiped away. Dry bleeding usually needs touch-up paint, sanding, or repainting the base area.
For future projects, remember these five rules:
- Use less paint.
- Offload your brush or roller.
- Press stencil edges firmly.
- Apply light coats.
- Seal edges on rough surfaces.
Clean stencil work is not about painting faster. It is about controlling paint movement. Once you master that, your stencil designs will look sharper, more professional, and easier to repeat.
References / Learn More
- Wikipedia’s stencil overview — useful for basic stencil definition and background.
- Cricut stencil film instructions — useful for Cricut stencil vinyl and stencil film users.
- Adobe Illustrator Auto-Simplify Paths guide — useful for cleaner stencil vector paths before cutting.