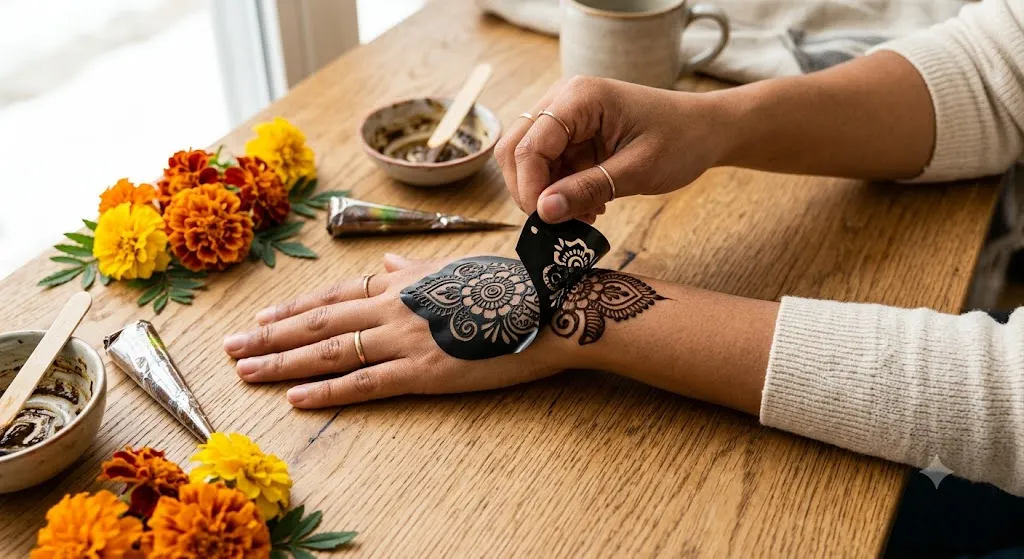
Mehndi stencils are one of the easiest ways to create clean, beautiful henna designs at home, especially when you are a beginner or preparing for Eid, weddings, parties, school events, or festive family gatherings. Instead of drawing every line freehand, a stencil gives you a ready-made pattern that you can place on your skin and fill with mehndi paste.
If you are new to stencil mehndi, start with simple floral, tikki, bracelet, finger, or back-hand patterns before trying heavy bridal-style designs. For a full design library, you can also explore our Mehndi & Festive Stencil Designs Complete Guide. If you want beginner design ideas, see our guide on simple mehndi stencil designs for beginners, and for festive occasions, check our article on Eid mehndi stencil designs for hands.
The best part is that you do not need professional mehndi skills to get a neat result. You only need a good stencil, fresh mehndi paste, clean skin, patience, and the right removal method. This guide explains the full process step by step, including preparation, application, drying time, removal, aftercare, and common mistakes to avoid.
What Are Mehndi Stencils?
Mehndi stencils are pre-cut design templates used to transfer or apply henna patterns on the skin. They usually come as adhesive stickers, plastic sheets, or reusable stencil sheets. The design has open spaces where mehndi paste is applied. Once the paste dries slightly, the stencil is removed, leaving the pattern on the skin.
Traditional mehndi is often drawn by hand using a cone, but stencils make the process faster and easier. They are especially useful for:
- Beginners who cannot draw neat lines yet
- People who want matching designs on both hands
- Quick festive mehndi before an event
- Kids or teens who want simple designs
- DIY home mehndi without booking an artist
- Practice before learning freehand mehndi
Henna itself comes from the Lawsonia inermis plant and has long been used for body art, including mehndi-style temporary skin designs. For general background, you can learn more from Wikipedia’s henna overview in the Learn More section.
Why Use Mehndi Stencils at Home?
Using mehndi stencils at home saves time and reduces design mistakes. If you struggle with shaky lines, uneven flowers, messy paisleys, or mismatched finger patterns, stencils can help you create a cleaner look.
Main Benefits of Mehndi Stencils
- Beginner-friendly
You do not need advanced drawing skills. - Fast application
A simple back-hand stencil can be filled in a few minutes. - Cleaner patterns
The stencil helps control shape and spacing. - Useful for both hands
Matching designs are easier with stencil sheets. - Great for events
You can prepare festive looks quickly at home. - Less pressure than freehand mehndi
You can focus on filling the design instead of creating it from scratch.
What You Need Before Starting
Before applying a mehndi stencil, prepare everything in one place. This helps avoid smudging and stress during application.
Basic Supplies
- Mehndi stencil or henna sticker
- Fresh natural mehndi cone
- Tissue paper or cotton pad
- Mild soap and water
- Towel
- Small scissors
- Toothpick or cotton bud
- Lemon-sugar mixture, optional
- Hair dryer or fan, optional
- Medical tape, optional for non-adhesive stencils
Choosing the Right Mehndi Cone
Use fresh, natural-looking mehndi paste whenever possible. Avoid “black henna” products that promise instant dark-black stains. The FDA has reported adverse reactions connected with some temporary tattoos, henna/mehndi, and “black henna” products, so it is safer to use trusted natural henna sources and patch test before applying.
A good mehndi cone should:
- Have a smooth paste texture
- Flow evenly without watery separation
- Smell natural or herbal, not chemical-heavy
- Not dry instantly in seconds
- Not claim “instant black stain”
Step 1: Choose the Right Stencil Design
The first step is selecting a design that matches your skill level and occasion.
Best Stencils for Beginners
If this is your first time, choose:
- Simple floral designs
- Round tikki designs
- Finger strips
- Bracelet-style wrist patterns
- Small motifs for the back of the hand
- Minimal Arabic-style patterns
Avoid very detailed bridal stencils at first. Tiny cuts and dense patterns can trap paste, lift unevenly, or smudge when removed.
Match the Design to the Body Area
Different stencil shapes work better on different areas:
- Back hand: floral, tikki, mandala, Arabic trails
- Palm: round tikki, traditional motifs, symmetrical patterns
- Fingers: thin strip stencils
- Wrist: bracelet and bangle-style designs
- Feet: anklet and toe patterns
For more design selection help, read our best mehndi stencil designs for beginners article.
Step 2: Clean and Dry Your Skin
Clean skin is very important. Oils, lotion, sweat, and dust can stop the stencil from sticking properly and may affect the final stain.
How to Prepare the Skin
- Wash the area with mild soap and water.
- Dry completely with a clean towel.
- Do not apply lotion, oil, perfume, or cream.
- Make sure the skin is not sweaty.
- If needed, wait a few minutes before placing the stencil.
The stencil must sit flat on dry skin. If the skin is oily or damp, the edges may lift and mehndi can bleed under the design.
Step 3: Cut the Stencil to Fit the Area
Many beginners use the stencil sheet exactly as it comes, but cutting it into smaller sections often gives better control.
Why Cutting Helps
- The stencil fits the hand curve better.
- Finger designs become easier to place.
- Wrinkles are reduced.
- Large designs are easier to align.
- Removal becomes less risky.
For example, if your stencil has a full-hand pattern, you can cut it into palm, finger, wrist, and back-hand sections. Apply each section carefully instead of forcing the whole sheet onto the skin at once.
Step 4: Place the Stencil Carefully
Now peel the stencil backing slowly and place it on the selected area. Do not rush this step because stencil placement decides how neat your final design will look.
How to Apply an Adhesive Mehndi Stencil
- Peel the backing slowly.
- Hold the stencil from the edges.
- Place the center first.
- Press outward gently.
- Smooth down corners and edges.
- Make sure there are no air bubbles.
- Check that the design sits flat on the skin.
If the stencil has tiny design cuts, press those areas softly so they stick properly. Do not stretch the stencil too much because it can distort the pattern.
Problem: The Stencil Is Not Sticking
Possible reasons:
- Skin is oily
- Skin is damp
- Stencil glue is weak
- The body area has too much hair
- Stencil was touched too much by fingers
- The stencil is old or dusty
Solution
Clean and dry the skin again. For non-adhesive or weak stencils, use small pieces of medical tape around the edges. Do not cover the design openings.
Step 5: Apply Mehndi Paste Over the Stencil
Once the stencil is fixed properly, start applying mehndi paste over the open design spaces.
Best Method for Filling the Stencil
- Hold the cone like a pen.
- Start from one side of the stencil.
- Apply a thin, even layer.
- Fill all open areas carefully.
- Do not press too hard.
- Avoid dragging the cone aggressively.
- Use a toothpick to clean extra paste around edges.
The paste should cover the open design areas but should not be extremely thick. A very thick layer can crack, take longer to dry, and smudge during stencil removal.
Should You Outline First or Fill Directly?
For simple stencil designs, you can fill directly. For detailed designs, lightly outline larger open areas first and then fill them. This gives better control and reduces overflow.
How Much Paste Should You Use?
Use enough paste to cover the skin through the stencil openings. The layer should be visible and raised, but not heavy like a thick cake layer.
Step 6: Let the Mehndi Dry Before Removing the Stencil
This is where many beginners make mistakes. If you remove the stencil too early, the design may smear. If you wait too long and the paste becomes too hard, it can crack and pull unevenly.
Ideal Drying Time
Drying time depends on paste thickness, room temperature, humidity, and cone quality. In most home situations, wait until the paste is slightly dry on the surface but not fully falling off. This often takes around 15–30 minutes for a thin layer, but dense designs may need longer.
How to Check If It Is Ready
The paste should:
- Look darker and less wet
- Feel slightly firm on top
- Not transfer easily when touched near the edge
- Stay in place when the hand moves gently
Do not blow too hard with your mouth because moisture can affect the paste. A fan on low setting can help, but keep your hand still.
Step 7: Remove the Stencil Without Smudging
Stencil removal should be slow and controlled. Never pull it quickly like a normal sticker.
Correct Removal Method
- Start from one corner.
- Peel slowly in the direction of the design flow.
- Keep your hand steady.
- Do not touch the wet paste.
- Remove small cut sections one by one.
- Clean any extra paste with a toothpick.
If paste is still wet and moving, stop and wait a few more minutes.
For a detailed removal guide, see our how to remove mehndi stencil without smudging article.
Step 8: Let the Mehndi Stain Develop
After removing the stencil, do not wash the mehndi immediately. Let the paste stay on the skin as long as possible for a better stain.
Basic Aftercare Tips
- Keep the paste on for several hours if possible.
- Avoid water during the early stain-developing period.
- Scrape off dried paste instead of washing it quickly.
- Keep hands warm after removal.
- Avoid soap for the first few hours.
- Do not rub the design roughly.
Many people use lemon-sugar mixture to help the paste stay longer, but use it lightly. Too much liquid can blur a delicate stencil design.
Common Mistakes When Using Mehndi Stencils at Home
Mistake 1: Applying Stencil on Oily Skin
Oil and lotion stop the stencil from sticking. Always clean and dry the skin first.
Mistake 2: Choosing a Very Detailed Design First
Heavy bridal-style stencils look attractive but can be difficult for beginners. Start simple.
Mistake 3: Using Too Much Mehndi Paste
A thick paste layer can spread under the stencil and ruin fine lines.
Mistake 4: Removing the Stencil Too Early
Wet paste smudges easily. Wait until the surface dries slightly.
Mistake 5: Pulling the Stencil Too Fast
Fast removal can drag paste across the skin. Peel slowly.
Mistake 6: Washing Immediately After Removal
Water can weaken the stain. Scrape dried paste instead of washing right away.
Mistake 7: Using Black Henna Without Checking Ingredients
Black henna may contain ingredients such as PPD, which has been associated with allergic contact reactions in academic and safety discussions. A medical review available through the NIH explains that PPD is a known contact allergen and can trigger delayed hypersensitivity reactions.
People Also Ask: Mehndi Stencil Questions
Can beginners use mehndi stencils at home?
Yes. Mehndi stencils are ideal for beginners because the pattern is already prepared. You only need to place the stencil correctly, apply paste evenly, let it dry, and remove it carefully.
Do mehndi stencils give a natural look?
They can look natural if you choose the right design and apply the paste neatly. Thin floral, Arabic, tikki, and finger stencils usually look more natural than overly dense sticker-style designs.
Can I reuse mehndi stencils?
Some plastic or reusable stencil sheets can be reused if cleaned properly. Most adhesive sticker stencils are designed for one-time use because the glue weakens after removal.
How long should mehndi stay after stencil application?
Keep the dried paste on as long as possible for a deeper stain. The longer it stays undisturbed, the better the color usually develops.
Why did my stencil mehndi smudge?
Common reasons include wet paste, early stencil removal, oily skin, too much paste, loose stencil edges, or moving the hand during drying.
Which stencil design is best for Eid?
For Eid, popular choices include floral back-hand designs, tikki patterns, bracelet-style wrist designs, and simple finger mehndi stencils. You can explore more in our Eid mehndi stencil designs for hands guide.
Real-World Use Cases for Mehndi Stencils
1. Eid Preparation at Home
If you are preparing for Eid and do not have time to visit a mehndi artist, stencils can help you apply neat designs quickly. Choose a matching back-hand and finger stencil for a complete festive look.
2. Wedding Guest Mehndi
For wedding guests, stencil mehndi is useful when you want elegant hands without a full bridal appointment. Arabic-style stencils work well because they look graceful and do not cover the entire hand.
3. Kids’ Mehndi Designs
Simple star, flower, heart, tikki, and bracelet stencils are good for kids. Avoid very strong chemical-smelling cones and always patch test first.
4. Practice for Freehand Mehndi
Beginners can use stencils to understand pattern flow, spacing, and design balance. Over time, you can start copying the stencil pattern freehand.
5. Last-Minute Party Look
If you have a party or family function, a small wrist or finger stencil can create a stylish look in a short time.
Beginner-Friendly Tips for Better Results
- Start with a small design before applying a full-hand stencil.
- Cut large stencils into smaller parts.
- Keep the hand flat during application.
- Use fresh mehndi paste.
- Apply paste evenly, not too thick.
- Peel slowly after partial drying.
- Avoid water after removing paste.
- Store unused stencils in a dry place.
- Take a photo of stencil placement before applying paste if you want symmetry.
- Practice once before an important event.
Problem-Solution Guide
Problem: The Design Looks Patchy
Cause: Uneven paste application or weak mehndi cone.
Solution: Apply a consistent layer and use fresh paste.
Problem: Lines Are Blurry
Cause: Too much paste or loose stencil edges.
Solution: Press stencil edges properly and use less paste.
Problem: Stencil Hurts When Removed
Cause: Strong adhesive or hair on the skin.
Solution: Remove slowly and avoid applying adhesive stencils on hairy areas.
Problem: Mehndi Stain Is Too Light
Cause: Paste removed too early, poor cone quality, or washing too soon.
Solution: Keep paste longer and avoid water after removal.
Problem: Design Is Not Centered
Cause: Stencil placed quickly without checking alignment.
Solution: Place the center first, then press outward.
Safety Tips Before Applying Mehndi Stencils
Mehndi is commonly used for festive body art, but safety still matters. Always do a small patch test if you are using a new cone or brand. Avoid applying mehndi on cuts, rashes, irritated skin, or sensitive areas. Do not use products that smell strongly chemical or promise instant black results.
If redness, burning, swelling, itching, or blisters appear, remove the product and seek medical advice. Health Canada also warns that allergic reactions to PPD in black henna products may appear within 1 to 14 days after skin contact.
Best Mehndi Stencil Types for Home Use
Adhesive Sticker Stencils
These are easiest for beginners. They stick directly to the skin and are usually disposable.
Best for: beginners, quick designs, Eid, parties
Weakness: may not be reusable
Plastic Reusable Stencils
These are washable and can be used again, but they need careful placement.
Best for: practice, repeated patterns
Weakness: may need tape to stay fixed
Finger Strip Stencils
These are small strips made for finger designs.
Best for: modern minimal mehndi
Weakness: can shift if not pressed properly
Tikki Stencils
Round patterns for palms or back hands.
Best for: traditional festive looks
Weakness: alignment must be centered
Final Checklist Before You Start
Before applying your stencil, check:
- Skin is clean and dry
- Stencil design matches the body area
- Stencil is cut to the right size
- Mehndi cone is fresh
- Stencil edges are pressed down
- Paste layer is thin and even
- You have time to let it dry
- You know how to remove it slowly
- You will avoid water after application
Conclusion
Using mehndi stencils at home is a simple and beginner-friendly way to create neat festive designs without professional drawing skills. The key is preparation: clean the skin, choose an easy stencil, place it carefully, apply a thin layer of mehndi, let it dry, and remove the stencil slowly.
If you want to build your mehndi stencil skills step by step, start with simple floral or tikki designs and then move toward fuller festive patterns. For more ideas, visit our Mehndi(meaning) & Festive Stencil Designs Complete Guide, explore simple mehndi stencil designs for beginners, and read our guide on how to remove mehndi stencil without smudging before your next application.
2 thoughts on “How to Use Mehndi Stencils at Home:(Beginner-Friendly Guide)”