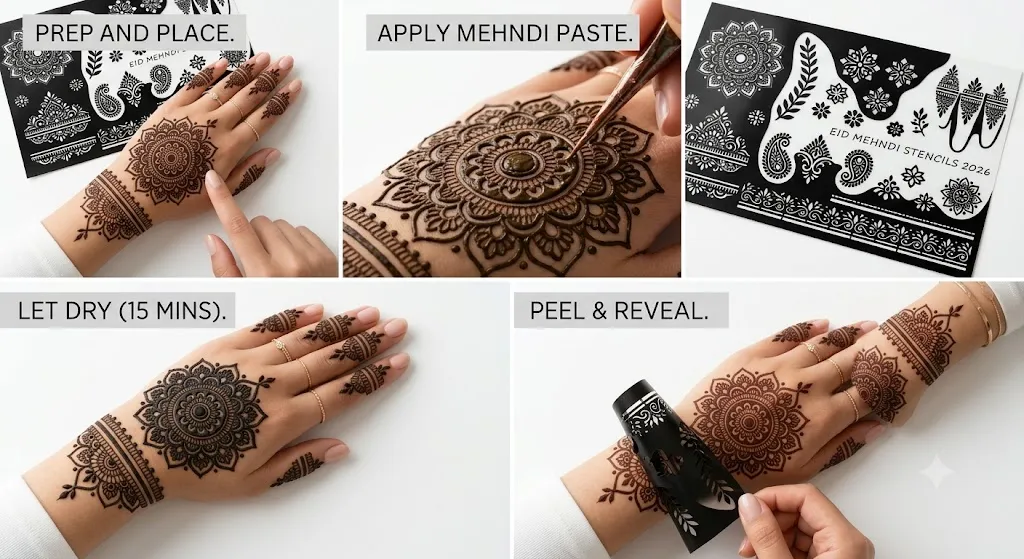
Bridal mehndi is one of the most meaningful beauty traditions in South Asian and festive wedding culture. It is not just hand decoration; it is a personal design story made with florals, paisleys, mandalas, jaali patterns, wrist cuffs, finger details, and symbolic motifs. For brides who want a clean, symmetrical, and professional-looking result without relying fully on freehand drawing, bridal mehndi stencil patterns are a practical solution.
This guide is part of our Mehndi & Festive Stencil Designs silo. For a complete overview of traditional, festive, and modern stencil ideas, start with the main pillar guide: Mehndi & Festive Stencil Designs Complete Guide.
A bridal mehndi stencil helps create repeated shapes with cleaner spacing, better balance, and less design anxiety. Instead of guessing where each flower, leaf, or mandala should go, the stencil gives you a structure. You can still personalize the look with shading, dots, borders, initials, negative space, and custom fillers.
Mehndi is commonly described as temporary skin decoration made with henna paste, and bridal mehndi is especially associated with wedding ceremonies and celebrations. Henna body art has deep cultural roots across South Asia, North Africa, East Africa, and the Middle East, and it is widely used for weddings and festivals.
What Are Bridal Mehndi Stencil Patterns?
Bridal mehndi stencil patterns are pre-cut design templates used to apply mehndi shapes on the hands, arms, wrists, feet, or ankles. These stencils may include floral vines, mandalas, peacocks, paisleys, lace-style jaali, bracelet bands, finger trails, lotus patterns, or full-hand layouts.
Unlike casual mehndi stencils, bridal stencils are usually more detailed. They are designed to cover larger areas and create a richer ceremonial look. A simple stencil may only include one palm motif, while a bridal stencil may include:
- A central palm mandala
- Wrist bracelet bands
- Finger ring patterns
- Floral vines
- Paisley borders
- Negative-space sections
- Back-hand jewelry-style chains
- Foot or ankle motifs
- Matching left and right hand layouts
The main benefit is consistency. Bridal looks often need both hands to feel balanced, especially for photography, close-up shots, ring ceremonies, and wedding rituals. Stencils make symmetry easier for beginners and faster for artists.
Why Brides Use Mehndi Stencils
Bridal mehndi stencils are useful because wedding preparation can be stressful. A bride may want a beautiful design but may not have the time, budget, or confidence for a long freehand session. Stencils reduce the pressure by giving the design a planned foundation.
They are especially helpful for:
- Beginners applying mehndi at home
- Brides who want neat, repeatable patterns
- Artists who need speed during busy wedding seasons
- Family members helping with bridal functions
- Bridesmaids who want matching festive designs
- Small mehndi businesses creating consistent results
- DIY bridal shoots, engagement ceremonies, and pre-wedding events
A stencil does not remove creativity. It simply controls the structure. After removing the stencil, you can enhance the design with dots, curves, fine borders, shaded petals, initials, names, or personalized motifs.
Best Bridal Mehndi Stencil Pattern Styles
1. Full-Hand Bridal Stencil Patterns
Full-hand bridal stencil patterns cover the palm, fingers, wrist, and sometimes the forearm. This style is ideal for brides who want a rich traditional look. The design usually begins with a strong central element on the palm and then expands outward.
Common full-hand stencil elements include:
- Central mandala
- Paisley clusters
- Dense floral filling
- Finger bands
- Wrist cuff pattern
- Lattice or jaali background
- Leafy vines
- Dotted trails
Full-hand bridal stencils are best for weddings, nikah ceremonies, sangeet nights, mehndi functions, and grand festive events. If you want a more detailed design variation, you can also create a supporting cluster article such as Full-Hand Bridal Mehndi Stencil Designs.
2. Mandala Bridal Mehndi Stencils
Mandala mehndi stencils are popular because they look balanced and photograph beautifully. A mandala is usually placed in the center of the palm or back hand. From there, the design may extend into fingers, wrist bands, or side floral patterns.
A bridal mandala stencil works well when:
- The bride wants a clean traditional look
- The outfit has circular embroidery or mirror work
- The design needs to look symmetrical in photos
- The artist wants a strong focal point
For bridal use, avoid making the mandala too small. A tiny mandala may look casual instead of bridal. Use layered circles, petal rings, dotted borders, and fine details to make the design feel fuller.
3. Floral Bridal Mehndi Stencil Patterns
Floral mehndi is timeless. Flowers soften the design and make it look elegant, feminine, and wedding-ready. Bridal floral stencils usually include roses, lotus shapes, leafy stems, tiny blossoms, and curved vines.
Floral stencil patterns work well for:
- Romantic bridal looks
- Engagement mehndi
- Bridesmaids’ hands
- Minimal bridal designs
- Back-hand jewelry-style mehndi
- Feet and ankle designs
A good floral bridal stencil should include both large and small flowers. Large flowers create focus, while smaller flowers fill empty areas without making the design look heavy.
4. Peacock Bridal Mehndi Stencils
Peacock motifs are common in traditional bridal mehndi because they create a royal and festive feeling. A peacock stencil may be placed on the palm, wrist, forearm, or back hand. It can also be combined with paisleys, feathers, vines, and mandalas.
Use peacock bridal stencils when the bride wants:
- A traditional Indian bridal look
- A dramatic full-hand pattern
- A royal or palace-inspired design
- A design that pairs well with lehenga, saree, sharara, or anarkali outfits
The key is not to overcrowd the peacock. Keep the body shape clear and use feather details as controlled fillers. If every feather is too dense, the stencil may blur after application.
5. Arabic Bridal Mehndi Stencil Patterns
Arabic bridal mehndi usually uses flowing vines, open spaces, bold flowers, and diagonal layouts. Compared to dense Indian bridal mehndi, Arabic patterns often feel lighter and more modern.
Arabic-style bridal stencils are perfect for brides who want:
- Elegant but not overly crowded hands
- Faster application
- More skin visibility
- Modern wedding photography
- A graceful diagonal flow
A strong Arabic bridal stencil should move naturally from the wrist toward the fingers. It should not look like separate motifs pasted together. For more ideas within the same silo, link to a related article such as Arabic Mehndi Stencil Patterns Guide.
6. Jaali Bridal Mehndi Stencils
Jaali patterns are lattice-like designs made with crisscross lines, diamonds, squares, dots, or net-style structures. In bridal mehndi, jaali is often used to fill the palm, fingers, wrist, or back hand.
Jaali stencils are useful because they create instant detail. However, they must be applied carefully. If the stencil moves, the lines can become messy. Use jaali patterns for:
- Finger detailing
- Palm backgrounds
- Wrist cuffs
- Back-hand panels
- Bridal feet designs
The best jaali mehndi stencils leave enough spacing between the lines. If the grid is too tight, the paste may spread and make the pattern look muddy.
7. Minimal Bridal Mehndi Stencils
Not every bride wants heavy full-hand mehndi. Some prefer minimal designs with clean spacing, delicate florals, and jewelry-style back-hand patterns. Minimal bridal stencils are especially popular for engagement ceremonies, courthouse weddings, destination weddings, and modern bridal shoots.
Minimal bridal stencil ideas include:
- Single palm mandala
- Bracelet-style wrist band
- Ring-chain back-hand pattern
- Small lotus on the palm
- Finger-only detailing
- Fine floral side trail
- Anklet-style foot stencil
Minimal does not mean plain. A minimal bridal stencil should still feel intentional. The empty space must look designed, not unfinished.
How to Choose the Right Bridal Mehndi Stencil Pattern
Choosing the right stencil depends on the bride’s outfit, ceremony type, hand size, comfort level, and desired design density.
Match the Stencil to the Bridal Outfit
A heavy lehenga with detailed embroidery pairs well with full-hand, mandala, peacock, or jaali stencils. A simple silk saree may look better with floral vines or traditional palm mandalas. A modern gown or fusion outfit may suit Arabic or minimal jewelry-style stencil patterns.
The goal is harmony. If the outfit is already very heavy, a slightly open mehndi design can create balance. If the outfit is simple, a detailed stencil can become the main beauty statement.
Consider Hand Shape and Size
A stencil that looks beautiful on one hand may not fit another hand perfectly. Small hands need smaller motifs and more open spacing. Long fingers can carry detailed finger bands and ring patterns. Wider palms can handle large mandalas, lotus blooms, and paisley clusters.
Before applying mehndi, place the stencil over the hand and check:
- Does the central motif sit correctly?
- Are the finger patterns aligned?
- Does the wrist band fit the wrist width?
- Is the design too close to the thumb?
- Does the stencil leave enough breathing space?
Choose the Right Density
Bridal mehndi can be light, medium, or heavy. A light bridal stencil gives a modern look. A medium-density stencil balances tradition and elegance. A heavy stencil creates a classic wedding effect.
For most brides, medium to heavy density works best for the main wedding ceremony. Light stencils are better for engagement, haldi, Eid, Diwali, bridesmaids, or pre-wedding events.
Step-by-Step: How to Apply a Bridal Mehndi Stencil
Step 1: Clean the Skin
Wash the hands and remove lotion, oil, sunscreen, or makeup. Mehndi stains better on clean, dry skin. If the skin is oily, the stencil may slip and the paste may not settle evenly.
Step 2: Test the Stencil Placement
Place the stencil on the hand before applying paste. Check the alignment of the palm, fingers, wrist, and thumb area. For bridal designs, symmetry matters, so do not rush this step.
Step 3: Secure the Stencil
Use a skin-safe adhesive stencil or gently hold the stencil flat. Make sure there are no air bubbles. A lifted stencil edge can cause smudging.
Step 4: Apply Mehndi Paste Evenly
Apply the paste over the stencil openings. Do not overload the stencil. Too much paste may bleed under the edges. Use a smooth, steady motion and fill each cutout carefully.
Step 5: Lift the Stencil Slowly
Remove the stencil from one side to the other. Do not pull upward suddenly. Slow removal helps keep the edges sharp.
Step 6: Add Freehand Details
After removing the stencil, add small dots, outlines, leaf tips, initials, or filler lines. This makes the design look custom instead of purely stencil-made.
Step 7: Let the Mehndi Dry Naturally
Allow the paste to dry properly. Avoid touching, folding fingers too much, or rubbing against clothing. Natural henna usually develops over time, and the final stain depends on paste quality, skin type, placement, and aftercare. Henna stains commonly deepen after removal and fade gradually as the skin exfoliates.
Bridal Mehndi Stencil Placement Ideas
Front Hand
The front hand is ideal for mandalas, lotus motifs, paisleys, and full-palm bridal designs. A palm-centered stencil creates a strong traditional look.
Back Hand
Back-hand bridal stencils look beautiful with jewelry patterns, bracelet cuffs, ring chains, floral trails, and Arabic layouts. This placement is perfect for ring photos.
Fingers
Finger stencils can include bands, leaves, dots, jaali, chevrons, or small florals. For bridal looks, avoid leaving the fingers too plain unless the design is intentionally minimal.
Wrist and Forearm
Wrist cuffs and forearm extensions make the mehndi look complete. A bridal stencil should not stop suddenly at the palm. Even a small bracelet border can improve the final look.
Feet and Ankles
Bridal feet stencils may include anklet patterns, toe details, lotus motifs, jaali panels, and floral trails. Feet designs should be slightly bolder because very tiny details may not show clearly from a distance.
Common Mistakes to Avoid
Mistake 1: Choosing a Stencil That Is Too Detailed
A very intricate stencil may look attractive online, but it can blur during application if the cutouts are too small. Choose clean patterns with enough spacing.
Mistake 2: Not Checking Hand Fit
Never apply a bridal stencil without testing placement. A misaligned mandala or crooked finger pattern can ruin the symmetry.
Mistake 3: Using Too Much Paste
Heavy paste does not always mean a better result. Excess paste can spread under the stencil and make the design messy.
Mistake 4: Removing the Stencil Too Quickly
Fast removal can drag the paste. Lift slowly and steadily.
Mistake 5: Ignoring Safety
Avoid unknown “black henna” products. The FDA has warned that some temporary tattoos and black henna products may cause adverse skin reactions, and black henna may contain ingredients such as PPD that are not appropriate for direct skin use.
Mistake 6: Leaving No Personal Touch
A bridal design should feel personal. Add initials, wedding dates, hidden names, symbolic motifs, or custom borders after using the stencil.
People Also Ask
Are bridal mehndi stencils good for beginners?
Yes. Bridal mehndi stencils are useful for beginners because they provide structure and reduce drawing mistakes. Beginners should start with medium-detail stencils instead of extremely dense full-hand designs.
Which bridal mehndi stencil pattern is best?
The best pattern depends on the bride’s style. Full-hand mandala and paisley stencils are best for traditional brides. Arabic floral stencils are best for modern brides. Jewelry-style back-hand stencils are best for minimal bridal looks.
Can stencil mehndi look professional?
Yes, stencil mehndi can look professional when the stencil is aligned properly, the paste is applied evenly, and freehand finishing details are added afterward. The finishing work makes the design look custom.
How do I make bridal stencil mehndi look unique?
Add personalized details such as initials, small wedding symbols, extra dots, shaded petals, fine outlines, or a custom wrist border. You can also combine two stencil sections, such as a mandala palm with Arabic finger trails.
Is full-hand stencil mehndi better than freehand?
Neither is automatically better. Freehand mehndi allows maximum creativity, while stencil mehndi gives cleaner structure and faster application. Many artists use both: stencil for the base and freehand work for personalization.
Problem-Solution Guide
Problem: The design looks too plain
Solution: Add finger bands, wrist cuffs, dotted trails, and small leaf fillers. A stencil base often needs finishing details to feel bridal.
Problem: The stencil keeps moving
Solution: Clean the skin, dry it fully, and press the stencil flat. Use a stencil with better adhesive or secure one section at a time.
Problem: The pattern is not dark enough
Solution: Use fresh, high-quality paste and allow proper drying time. Avoid washing the area too soon after removal.
Problem: The design looks uneven on both hands
Solution: Mark the center point of each palm before applying. Align the main motif first, then adjust fingers and wrist.
Problem: The stencil design looks copied
Solution: Use the stencil only as a base. Add custom initials, shaded flowers, extra borders, or a unique wrist extension.
Real-World Bridal Use Cases
Wedding Day Bride
Use a full-hand bridal stencil with mandala, paisley, jaali, and wrist extension. Add freehand initials or wedding-date details.
Engagement Bride
Use a back-hand jewelry stencil with floral ring chains and a delicate bracelet cuff. Keep the palm lighter for a modern look.
Bridesmaids
Use matching Arabic floral stencils or small mandala palm patterns. This creates a coordinated look without taking too much time.
Destination Wedding
Choose minimal bridal stencils with clean florals, bracelet bands, and finger details. These are easier to apply and maintain while traveling.
Pre-Wedding Photoshoot
Use bold palm motifs, back-hand jewelry patterns, and foot stencils that show clearly in close-up photography.
Bridal Mehndi Stencil Design Tips for a Premium Look
To make a stencil design look more expensive and professional, focus on finishing. The stencil gives the outline, but the details create the luxury effect.
Use these tips:
- Add fine dots around floral borders
- Outline major motifs after stencil removal
- Keep spacing intentional
- Use bold borders around wrist cuffs
- Add tiny leaves to connect empty areas
- Use symmetry on both hands
- Match the design style with jewelry and outfit embroidery
- Avoid mixing too many motif styles in one design
A good bridal mehndi stencil pattern should feel balanced from a distance and detailed up close. That is the difference between a basic stencil and a wedding-ready design.
Final Thoughts
Bridal mehndi stencil patterns(Meaning) are perfect for brides who want beauty, structure, and consistency without the pressure of full freehand design. They are useful for beginners, professional artists, bridesmaids, and DIY wedding preparation. The best results come from choosing the right stencil style, aligning it carefully, applying paste evenly, and adding personal finishing details.